

Applications
Register applications for single sign-on over OpenID Connect, SAML 2.0, or WS-Federation, from the catalog or custom, and control access.
An application is anything your users sign in to through the platform: a web app, a mobile app, a single-page app, a service that calls an API, or a legacy enterprise application. Registering an application establishes the trust between it and the platform's single sign-on and tells the platform how to issue tokens or assertions for it.
You manage applications under Integrations → Applications in the Admin Console.
The Applications page
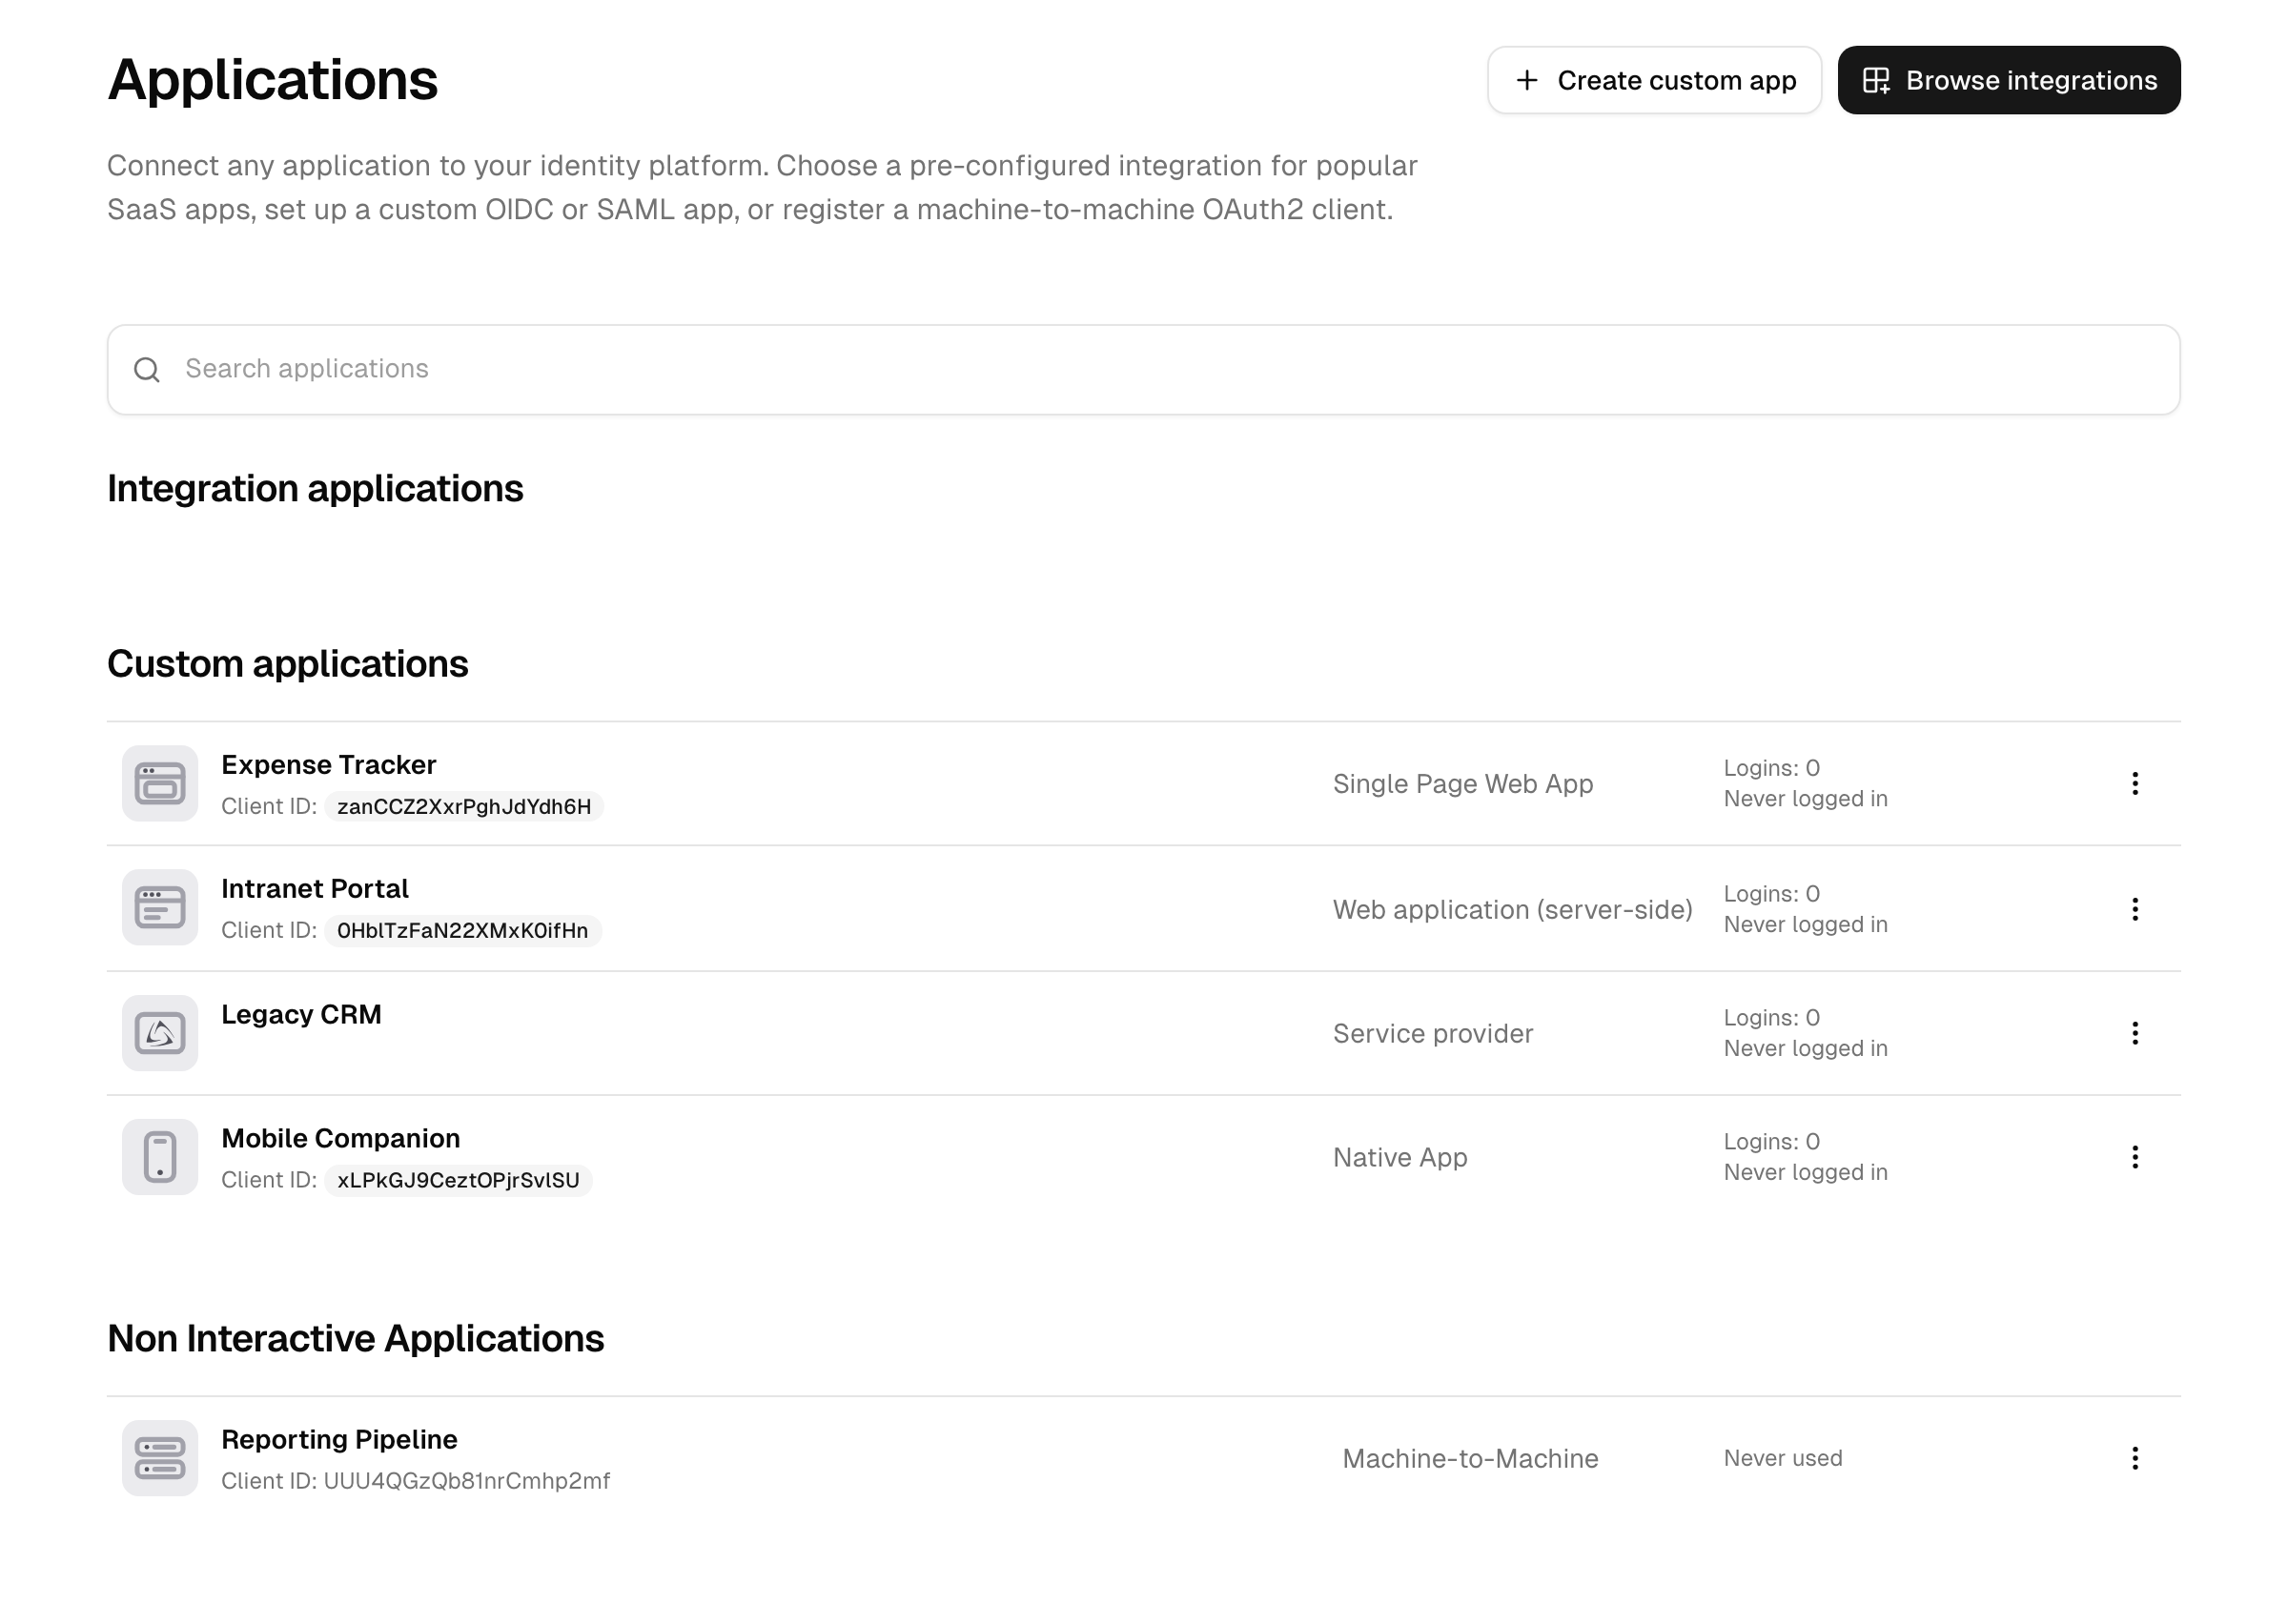
The Applications page lists everything you have registered, split into three tabs:
- Applications: the apps people sign in to, in two sections. Integration applications are apps you added from the built-in catalog (shown as SSO Integration), each carrying the vendor's protocol defaults. Custom applications are interactive apps you configured yourself for OIDC, SAML, or WS-Federation.
- Machines: machine-to-machine services that authenticate with a client secret and never have a person sign in, and provisioning-only applications.
- Dynamic registrations: initial access tokens and the applications that registered themselves. See Dynamic client registration.
Each row shows the app's sign-in activity: a login count and a last access time, or Never logged in (interactive apps) / Never used (machine-to-machine) when it has never been called.
Use the search box above the list to filter the current tab by name, type, client ID, or integration. A limit banner appears near the top when you are approaching the number of applications your plan allows.
Two buttons start a new app: Browse integrations (the catalog) and Create custom app. Search the catalog first — building a custom app only makes sense when no integration exists for your target.
Protocols
The platform issues identity over three protocols. You pick one when you create the application:
- OpenID Connect (OIDC) — the modern standard for web, single-page, mobile, and machine-to-machine applications. Supports the authorization-code flow with PKCE, refresh tokens, the device-authorization grant, client credentials, and back-channel logout.
- SAML 2.0 — the established enterprise SSO standard. The platform acts as the Identity Provider and issues signed (optionally encrypted) assertions, supporting IdP- and SP-initiated sign-in and Single Logout.
- WS-Federation — for older Microsoft-oriented relying parties (for example, Exchange OWA). The platform issues signed SAML 1.1 tokens through a Security Token Service.
Which protocol to choose
Pick OIDC whenever you can: for everything you build yourself, and for any vendor application that supports it. It covers every application type from browser apps to machine-to-machine, and it is where the newer security capabilities live (PKCE, DPoP, the Financial-grade API profiles, token exchange). Pick SAML 2.0 when the application supports nothing else, which is still common in established enterprise software; the sign-in experience for users is the same. WS-Federation exists for legacy relying parties; do not choose it for anything new.
Application types
When you create a custom application you choose a type, which sets sensible protocol defaults and decides which configuration is shown:
| Type | Protocol | Use it for |
|---|---|---|
| Web application (server-side) | OIDC | Server-side web apps that can keep a client secret confidential. |
| Single-page application | OIDC | Browser apps with no backend; authenticate with PKCE, no client secret. |
| Native application | OIDC | Mobile and desktop apps; authenticate with PKCE, no client secret. |
| Device application | OIDC | Input-constrained devices using the device-authorization flow. |
| Machine-to-machine | OIDC | Service-to-service access with the client-credentials grant; no interactive sign-in. |
| SAML application | SAML 2.0 | A SAML Service Provider that trusts the platform as its Identity Provider. |
| WS-Federation application | WS-Federation | A relying party that consumes SAML 1.1 tokens. |
| Provisioning-only | — | An application you only provision accounts into, with no single sign-on. See Application provisioning. |
Whether an application can keep a secret confidential (web, machine-to-machine) or not (single-page, native, device) determines how it authenticates to the token endpoint and whether a client secret is issued. When you pick a type, the platform normalizes the allowed grant and response types to match it — you do not set them by hand.
Choosing an OIDC type by deployment shape
For a custom OIDC app, match the type to where the code runs and which credential it can protect:
| Deployment shape | Type | Credential | Recommended flow |
|---|---|---|---|
| Server-side web app (has a backend that can keep a secret) | Web application (server-side) | Client secret (confidential) | Authorization code |
| Single-page app (runs in the browser) | Single-page application | None (public client) | Authorization code + PKCE |
| Mobile / desktop app | Native application | None (public client) | Authorization code + PKCE |
| Backend service with no user (server-to-server) | Machine-to-machine | Client secret (confidential) | Client credentials — see APIs |
A public client (single-page, native, device) cannot keep a secret safe, so it never receives a usable client secret and relies on PKCE to protect the authorization-code exchange. Use a confidential type only when your app can store a secret server-side.
A browser app may call the token and userinfo endpoints only from the origin (scheme, host and port) of one of its redirect URIs; requests from any other origin are refused.
Adding an application
From the catalog
The catalog contains pre-built integrations for common applications. Each one carries the right protocol defaults, a guided setup with the exact values to paste into the target application, and — where available — a provisioning template. Adding one is a two-step flow:
- Go to Integrations → Applications, choose Browse integrations, and pick the application.
- Read the prerequisites and consent screen. It lists what the integration needs (for example, an admin account in the target system) and what access it will use. Acknowledge it to continue.
- Complete the short, integration-specific setup form (for example, the application's domain or subdomain) and create the app.
- The application is created with the catalog's defaults already applied; refine its configuration afterwards on the tabs described below.
A few catalog behaviours to know:
- Single-instance integrations can only be configured once — if one is already set up, the catalog blocks a second. Most integrations can be added multiple times (for example, one per environment).
- Disabled catalog entries cannot be added; they appear for reference but the create flow rejects them.
- Some catalog entries are provisioning-only — they create accounts downstream but do not provide sign-in. See Application provisioning.
- Catalog tiles carry a maturity label. A well-established integration shows none; a newer one is marked beta (functional, still being refined) or experimental (early, may change). Prefer stable integrations for production, and test a beta or experimental one before you rely on it.
Each catalog integration includes a guided setup in the create flow with the exact values to paste into the target application (and, where provisioning is supported, the SCIM steps). The per-application steps live in that guided setup rather than in this documentation, so they stay in sync with the integration.
Decision note: search the catalog before building a custom app. A catalog integration saves you the protocol wiring and, where available, the provisioning mapping. Build a custom app only when no integration matches your target.
As a custom application
- On the Applications page, choose Create application.
- Enter a name and pick the type (see the table above).
- Save. The platform creates the application with protocol defaults for that type. For SAML and WS-Federation applications it also generates a signing certificate automatically.
- Open the application and configure it on the tabs below.
OpenID Connect clients can also register themselves, authorized by an initial access token you issue. See Dynamic client registration.
Configuring an application
Each application opens with a set of tabs. Which tabs and fields appear depends on the protocol and type.
General settings
Available for every application:
- Name and Description.
- Contacts: the people to ask about the application, picked from the employees. Purely informational: contacts receive no rights. Catalog integrations offer the same field on their Settings tab.
- Application logo and Application URI — used to present the application in the user's app portal. A second, optional logo can be set for dark mode; it replaces the standard logo while the dark theme is active and is worth setting for logos that are dark themselves. Applications created from the integration catalog take both logos from the catalog entry.
- Display in the app portal — whether end users see the application as a tile they can launch. Catalog integrations offer the same toggle on their Settings tab; a new integration starts visible (unless its catalog entry says otherwise) and your choice is kept on later saves. The tile only appears when the integration provides an application URL, which many SAML integrations do not; the Settings tab tells you when that is the case.
The Destructive actions section at the bottom holds: rotate the client secret, renew the signing certificate, change the application type, and delete the application. Each asks you to confirm by typing the application name.
OpenID Connect settings
For OIDC applications you configure:
-
Client ID — generated automatically; read-only.
-
Client secret — issued for confidential applications (web, machine-to-machine). Shown masked, with copy and reveal controls. See Rotating a client secret.
-
Token endpoint authentication method — how the application authenticates to the token endpoint: a client secret in the request body or header, Private Key JWT (the application signs an assertion with its own private key, so no shared secret is exchanged), or none for public clients. On dedicated deployments with a mutual TLS edge, two certificate methods are also offered: Mutual TLS (self-signed certificate), where the presented client certificate must match one registered under Client keys, and Mutual TLS (CA-signed certificate), where the certificate is verified against a customer-provided certificate authority and matched by its subject (fill exactly one of subject DN or DNS SAN). On other deployments the two methods are shown but disabled. See Financial-grade API security.
-
Grant types — the flows the application may use. Which checkboxes appear depends on the type:
- Acting on behalf of a user: authorization code, refresh token (and implicit, where still required; an access token from an implicit or hybrid flow is only issued with
response_mode=form_post, never in the URL fragment). - Acting on behalf of itself: client credentials (machine-to-machine).
- Token exchange — exchange one token for another, used when a service needs to call a downstream API as the original user (delegation) rather than as itself.
Response types are derived from the grants you allow; you do not set them separately.
- Acting on behalf of a user: authorization code, refresh token (and implicit, where still required; an access token from an implicit or hybrid flow is only issued with
-
Redirect URIs and post-logout redirect URIs — see Redirect and post-logout URIs.
-
Back-channel logout URI — a server endpoint the platform calls to log the user out of this application when their session ends.
-
Initiate login URI — used for IdP-initiated sign-in into the application.
-
Protocol hardening — switches that can be used on their own or come as part of a security profile, which then sets and locks them:
- Require proof of possession (DPoP) — bind issued access tokens to the application's key so a stolen token cannot be replayed.
- Require certificate-bound access tokens (mTLS) — bind issued access tokens to the application's TLS client certificate instead. Offered on dedicated deployments with a mutual TLS edge; cannot be combined with the DPoP requirement.
- Require pushed authorization requests (PAR) — the application sends its authorization parameters to the platform back-channel first and redirects the user with a short reference, so the parameters never appear in the browser URL. Offered only for applications that use the authorization endpoint.
- Require a signed request object (JAR) — authorization parameters are only accepted inside a JWT signed by the application. A client key or JWKS URI has to be registered first, otherwise no authorization request can succeed. Requires the Advanced or Pro subscription, like the client keys it depends on; without it the switch is shown but disabled, and a setting made earlier stays in force.
-
Require user consent — prompt the user to consent before tokens are issued.
-
ID token lifetime and maximum authentication age — see Token lifetimes and logout.
-
OIDC discovery URL — the read-only
.well-known/openid-configurationURL the application uses to find the platform's endpoints and signing keys. Hand this to your integrator.
Which claims the application actually receives is configured on its Attributes tab, see Attributes and claims.
Redirect and post-logout URIs
A redirect-URI mismatch is the single most common cause of broken SSO, so configure these carefully.
- Redirect URIs — the exact callback URLs the platform may return the user to after sign-in. Required for the authorization-code flow. The match is exact: a trailing slash, a different port, or
httpvshttpsmakes the platform reject the response, and the user sees an error instead of being signed in. If the URL your app sends does not appear in this list, sign-in fails. - Post-logout redirect URIs — the return URLs the platform is allowed to send the user back to after sign-out.
You can list several entries, one per line, to cover multiple environments. Avoid wildcards and localhost in production registrations — they widen what an attacker can redirect to. Add a separate development app with its own localhost URI instead.
For SAML and WS-Federation, the equivalent is the ACS URL / reply-URL allowlist: when the request does not name a return target, the platform uses the first (default) entry. For SAML the default port is ignored when the ACS URL and the issuer are compared, so https://host:443/... and https://host/... count as the same entry.
Troubleshooting — sign-in returns an error instead of the app: the callback URL your application sent is not in the redirect URIs (or differs by a slash, port, or scheme). Copy the exact URL from the error or your app's configuration and add it here.
SAML settings
For SAML applications you configure the Service Provider (SP) connection. The tab is grouped into five sections, in the order you work through them: Configuration source, Single sign-on, Single logout, Signing and encryption, and Identity provider details. The attribute mapping sits on its own Attributes tab, see Attributes and claims.
Configuration source
Pick one of three modes:
- URL: paste the SP's metadata URL and save. The URL is validated on save: if it cannot be reached or does not return valid SAML metadata, the save is rejected, so a broken source is never stored. (A Test button checks the URL before you save.) Optionally turn on automatic refresh and pick an interval (from every 5 minutes up to daily) to re-fetch the metadata on a schedule, so a certificate or endpoint change on the SP side is picked up without re-importing; if a scheduled refresh later fails, a warning appears under Issues. The automatic refresh only works with an
https://URL. It applies certificate rotations, the logout endpoint, the signature flags and assertion consumer service changes on a host the SP already used, and records each applied change in the audit log. A new entity ID or an assertion consumer service on a new host is not applied on its own, since that is where every sign-in response of the application goes: the application keeps its current metadata and an issue asks you to review the change. Use Fetch now to apply it, or to refresh immediately at any time. Leave automatic refresh off to import the metadata once and keep it fixed. - File: drop the SP's metadata XML.
- Manual: fill the fields in the sections below by hand.
In the two metadata modes the values taken from the metadata are shown read-only in the section they belong to: the SP's entity ID and ACS endpoints under Single sign-on, its logout endpoint under Single logout, and its certificates plus the declared signature flags under Signing and encryption. Reading the metadata XML to find out what is in effect is therefore never necessary. The matching input fields are hidden while an import is in charge, and their stored values are left untouched, so switching back to Manual restores what was last entered by hand.
Single sign-on
- Assertion consumer service URI: where the SAML assertion is sent. Required. When the SP starts a request without naming an ACS, the first (default) ACS URL is used.
- Assertion consumer service method: how the assertion is delivered: POST, Redirect, or same as the request.
- Audience: the SP's identifier. It is used as the audience when a sign-in starts without a SAML request, so it stays editable in the metadata modes as well.
- IdP-initiated sign-in: allows a sign-in to start here instead of at the SP, for example from the tile in the app portal.
Single logout
- Single logout service URI and its method: where SAML logout messages for this SP are sent. When set, the application takes part in Single Logout: signing out of the platform, or out of another participating application, also ends the session at this SP. In the metadata modes both values are imported from the SP's metadata (POST is preferred when the SP publishes both bindings) and kept in step with every metadata refresh, so they only need to be entered by hand in manual mode. When the metadata declares no logout endpoint, the section says so instead.
- Logout delivery: shows whether a server-to-server logout has ever succeeded for this application, and when it last did.
How the request reaches the SP needs no configuration. While the user is signing out in a browser, the logout is delivered through it (a hidden frame per application), which is what lets each SP clear its own session cookies. When a session ends without a browser (a session an administrator terminated, an idle session, a session ended as a security response, or every session of an account that was suspended, deleted or had its password changed or reset), or when the browser could not complete the delivery, the request is sent directly from server to server instead. Applications reachable only from the user's network are therefore signed out normally when the user is present, and are not reported as failures merely because the platform itself cannot reach them. An application whose logout endpoint did respond before and stops responding, or that rejects the request, is raised under Issues instead, where one entry covers the condition rather than one per sign-out.
Signing and encryption
- Inbound requests: whether the SP signs its authentication and logout requests. Its signing certificate is required for this, and unsigned or badly signed requests are then rejected. While the certificate is missing, logout requests from the SP are refused and an issue names the application.
- Response signature: which part of the response carries the signature: the SAML response, the assertion, or both. At least one signature is always applied. In the metadata modes the assertion signature follows the SP's metadata (
WantAssertionsSigned); only the response signature comes from this setting. - Assertion encryption: encrypts the assertion for this SP. Enable it only when the SP requires encrypted assertions.
- Service provider signing certificate: the certificate incoming requests are verified against.
- Service provider encryption certificate: only needed when the SP publishes a separate certificate for encryption, otherwise its signing certificate is used.
Identity provider details
Everything the SP needs in order to trust this identity provider, read-only and with a copy button: the metadata URL (importing it covers all the other values), the entity ID (Issuer), the sign-on URL, the single logout URL, and the signing certificate with its fingerprint. See Signing and encryption certificates.
WS-Federation settings
For WS-Federation applications the tab is grouped into three sections (the attribute mapping sits on the Attributes tab, see Attributes and claims):
- Relying party: the realm the request must match, and the reply URL allowlist of permitted return targets (the first entry is the default).
- Security token: the token lifetime, how long the issued SAML 1.1 token is valid.
- Identity provider details: read-only values for the relying party, each with a copy button: the federation metadata URL, the entity ID (Issuer) of the issued tokens, the sign-in URL the relying party sends its requests to, and the signing certificate with its fingerprint.
Attributes and claims
The Attributes tab answers one question for every protocol: what does this application learn about the user? What it offers depends on the protocol, because SAML and WS-Federation let you name attributes freely while OIDC claim names are fixed by the specification.
Machine-to-machine and device applications have no such tab. They receive neither an ID token nor an assertion carrying user attributes.
SAML and WS-Federation
Both protocols emit user attributes in the assertion, and both let you rename each one to what the receiving application expects.
- Name ID source — select which user field becomes the assertion's subject (the Name ID).
- Emitted attributes: every standard (basic) attribute and every custom attribute has a checkbox and a name field. The checkbox decides whether the attribute reaches the assertion at all, the field holds the exact name it is sent under. Edit the field when the SP expects, say,
mailinstead ofemail; the reset button next to it restores the name the attribute started with. An attribute that is not ticked is not sent, and its name cannot be edited until you tick it.
This mapping changes only the names the receiver sees, it does not transform or compute attribute values. The NameFormat the assertion declares next to an attribute follows the name you enter: a name in URI form is declared as a URI, a plain one as basic.
The group filter below the mapping decides which groups end up in the assertion. The assertion carries distinguished names, and the filter matches against the distinguished name as well as the plain group name, so a term like APP-JIRA works with either matching mode.
OIDC
- Standard claims: a read-only overview of the claims released per scope, so you can see what the application gets for the scopes it requests. These names are fixed by the OpenID Connect specification and cannot be renamed. Claims marked with an asterisk additionally require the user's directory to enable the underlying profile field: the scope alone does not put them in the token. A claim marked as deprecated is still issued, but will be removed in a future release, so do not build a new integration on it. Currently that is the
rolesclaim in thegroupsscope: roles belong in the access token, issued through an RBAC-enabled API, or in therolesscope. - Custom claims: select which custom attributes the application receives in addition. Each selected attribute is issued as a top-level claim under its own name, alongside the standard claims, when the application requests the
profilescope. A value is only issued when the attribute is assigned to the user's directory, so selecting an attribute never reveals more than that user actually carries. Nothing is selected by default: an application receives a custom attribute only after you opt it in here. - Group-name format: how each group is named in the
groupsclaim: its distinguished name, its plain name, or its id. Pick the form the application expects when it maps groups to its own access. - Group filter: which groups the application is told about at all. Without a filter every group the user belongs to is sent, and a directory-synced user easily carries a few hundred, which bloats the token and hands each application the full internal group structure. Enter a term and choose whether a group has to contain it or start with it. The term is compared against the group name and its distinguished name, ignoring case, and one match is enough. It is deliberately not compared against the value in the claim itself: with the group-name format set to the id that value is an internal identifier, and changing the format would otherwise empty the claim without warning. Leave the filter empty to keep sending everything.
Regular expressions are deliberately not offered: the filter runs on every sign-in against every group of the user, where a pathological pattern would slow down or stall the login path.
Application owners (deprecated)
Deprecated: Application owners no longer grant administration rights; delegated administration works through Workspaces. Owners still count only for the deprecated setting Owners manage access.
Owners manage access (deprecated): where this setting was turned on (since 26.2), it keeps working. Only the application's owners (whatever their access level), full administrators and, inside a workspace, its members with Manage access can then grant or revoke access, and the management API cannot change the application's assignments. The owners tab appears only while the setting is on: it lists the owners, lets you remove one and lets you disable the setting. Disabling removes the owners as well, and the setting cannot be enabled again. While any application still uses it, the applications list shows a notice.
To control who may assign or revoke access to an application, add it to a workspace and turn on Workspace members manage access. Only workspace members with the Manage access permission (plus responsibles and full administrators) can then assign the app or change the membership of the workspace's groups. Full administrators are never locked out. Letting users request access through an approval workflow keeps working regardless.
For the access levels this draws on, see Admin console users.
Rotating a client secret
For confidential OIDC applications you can rotate the client secret at any time from the application's general settings → Destructive actions:
- Choose Rotate secret and confirm by typing the application name.
- The platform generates a new secret immediately; the old secret stops working at once.
- Reveal and copy the new secret, then update it in the application's own configuration.
Because rotation invalidates the previous secret instantly, plan a short maintenance window or use it during a deployment that picks up the new value. Rotating the secret does not break the integration itself — only the stored secret changes.
Credentials: secret vs signing certificate
How an application proves the platform issued its tokens depends on the protocol:
- OIDC confidential apps (web, machine-to-machine) carry a client secret. It is shown masked on the OIDC settings tab — reveal it to copy. You can rotate it without re-registering the application.
- SAML and WS-Federation apps use a signing key / certificate instead of a secret. The platform signs assertions and tokens with it, and the SP verifies the signature against the published certificate.
The signing keys behind these certificates are asymmetric (public-key) by default, so integrators fetch the matching public key from the platform's published metadata or JWKS rather than sharing a symmetric secret. The signing keys are managed centrally — see Signing keys.
Financial-grade API security
Note: Available with the Advanced and Pro subscription.
For applications handling high-value data (open banking, payments, health records), a security profile applies the hardened behaviour of a Financial-grade API (FAPI) profile to that application only. Other applications are unaffected. Two profiles are offered: FAPI 2.0 Security Profile, described below, and FAPI 1.0 Advanced, which builds on it and needs the Pro subscription.
The profile sits at the top of the OIDC settings tab, above the protocol settings it governs. Use Edit next to Security profile to change it. It is offered for confidential applications, because the profile rules out shared client secrets.
Working towards a profile
You do not have to decide on a profile up front. Configure the individual settings one at a time (key-based client authentication, a client key, proof of possession, pushed authorization requests, a signed request object) and switch the profile on when the application is ready for it.
Some requirements are not something to configure at all. PKCE, the PS256 signing algorithms and signed authorization responses are applied by the platform when the profile is switched on.
Switching the profile on also selects Private Key JWT if the application still uses a client secret. The public key can be registered before or after that (see below); until a key exists the application cannot be used, and every attempt to use it is listed under Issues.
Selecting FAPI 2.0 Security Profile enforces, for that application:
- Key-based client authentication — Private Key JWT (or mutual TLS, on deployments that provide it). A client secret is not accepted.
- Sender-constrained access tokens — a stolen access token cannot be replayed by anyone else. Proof of possession (DPoP) is switched on and cannot be turned off; where certificate-bound access tokens are selected instead (dedicated deployments), they take its place.
- Pushed authorization requests — the application sends its authorization parameters to the platform back-channel first, then redirects the user with a short reference instead of exposing parameters in the browser URL.
- PKCE with the S256 challenge method.
- Authorization code flow only — implicit and hybrid flows are rejected.
- Stronger signatures — the application's ID tokens and client assertions use PS256 rather than RS256.
Access tokens are not part of that. A JWT access token is signed by the API it is issued for, with the Signing algorithm set on that API, and the default there is RS256. FAPI expects PS256 or ES256 for it as well. If an application with a profile can reach an API that uses neither, those APIs are named next to the profile on the OIDC settings tab. The algorithm has to be changed on the API itself (see APIs), and it then applies to every application using that API.
Once a profile is active, the settings it pins keep their checkbox but are locked, marked Enforced: proof of possession and pushed authorization requests stay selected and cannot be cleared, and the client authentication methods a profile does not permit are disabled. Signed request objects stay editable under FAPI 2.0, which does not require them. PKCE and PS256 have no setting of their own; they are applied with the profile. Saving a profile fails with an explanatory message only if a requirement cannot be met at all, for example on a public application, which can never satisfy key-based client authentication.
A profile can be switched back to No profile at any time. Applying a profile to an application that is already in use is a breaking change for it: from that point on its client has to send pushed authorization requests, a PKCE challenge and proof of possession.
Registering client keys
Private Key JWT needs the application's public key so its signed assertions can be verified. Keys are managed in the Client keys card at the bottom of the OIDC settings tab, which offers two mutually exclusive sources:
- Registered keys (shown first) — select Add key and paste a PEM-encoded public key or X.509 certificate; the key is stored right away. RSA keys must be at least 2048 bits; EC keys must use the P-256 curve.
- The registered keys are listed in a table with name, thumbprint, key type, the date added and, where applicable, the certificate expiry.
- An optional name can be given. It is worth setting: when a key is replaced, both the old and the new one are listed, and the name is what distinguishes them at a glance. The thumbprint stays in its own column, because that is the value the application sends with each assertion; it is shortened to fit the row, hovering it shows the full value, and the full value can still be selected and copied. The confirmation dialog names the key it is about to remove.
- If the upload was a certificate, its expiry date is shown as well, and an expired one is marked. This is information only. The key keeps working, because it is the key that verifies the application's assertions, not the certificate around it. Replace it when its certificate has expired.
- JWKS URI — point to a key set the application publishes itself. The keys are then fetched from there, which lets the application rotate its own keys without changes here. The URL must use https: over an unencrypted connection the published keys could be replaced in transit, and anyone doing so could authenticate as the application.
- On save, the URL is retrieved once as a check. If no key set comes back, the URL is still saved and a warning names the reason. That is intentional, so a URL can be entered before the application publishes its keys. Until the URL serves a key set, the application cannot be used, and the first attempt to use it is recorded under Monitoring.
To move between the two, use the link below the section: Use a JWKS URI instead under the key table, and Enter keys manually under the URI field. Registering a key removes a stored JWKS URI, and saving a JWKS URI removes the registered keys, so the two sources never coexist.
Three settings need a key: Private Key JWT, Mutual TLS (self-signed certificate) and Require a signed request object. While one of them is enabled and neither a key nor a JWKS URI is registered, the OIDC settings tab opens with a warning that jumps to the Client keys card. Keys can also be added ahead of time, before the method is switched. For mutual TLS with a self-signed certificate, upload the client certificate itself rather than a bare public key: the connection is authenticated by matching the presented certificate against the registered one.
The private key never leaves the application.
FAPI 1.0 Advanced
Some ecosystems (older open-banking schemes in particular) mandate the earlier FAPI 1.0 Advanced profile. It is available with the Pro subscription and adds three requirements on top of everything listed above:
- Signed authorization responses (JARM) — the response to an authorization request is returned as a signed JWT instead of plain URL parameters, so the application can verify it was not tampered with in the browser. This is not optional for the profile: an application on FAPI 1.0 Advanced has to request the JWT response mode, otherwise its authorization requests are rejected.
- Signed request objects (JAR) — authorization parameters are only accepted inside a JWT signed with the application's own key, and that JWT may not be valid for longer than an hour.
- Certificate-bound access tokens (mTLS) — on dedicated deployments with a mutual TLS edge, access tokens are bound to the application's TLS client certificate, as the profile mandates.
All of them are enforced automatically once the profile is selected, and listed as enforced on the OIDC settings tab. Switching back to FAPI 2.0 or to no profile lifts them again.
Note: On deployments without a mutual TLS edge, access tokens on this profile are bound with DPoP instead, which the profile itself does not accept. Contact support if an integration has to be certified against the full profile.
Signing and encryption certificates
SAML and WS-Federation applications use a certificate the platform generates automatically when the application is created. You do not edit it directly; its public certificate, fingerprint, and a metadata URL are shown read-only so you can hand them to the application.
If a certificate is nearing expiry or you need to roll it, use Renew certificate under Destructive actions. The application must then be updated with the new certificate (or re-import the metadata URL). The signing keys behind these certificates are managed centrally — see Signing keys.
Token lifetimes and logout
- OIDC — set the ID token lifetime and an optional maximum authentication age (which forces re-authentication when the session is older than the limit). Configure logout behaviour through the post-logout redirect URIs and the back-channel logout URI.
- SAML — assertion validity is controlled by the platform; configure Single Logout through the Service Provider's SLO URL.
- WS-Federation — set the token lifetime directly on the application.
Machine-to-machine and API token lifetimes are governed by the API you protect — see APIs.
Assigning applications to users
Registering an application does not grant anyone access to it. You decide who can use it on the application's assignments tab, where you can assign it to:
- individual users,
- groups — see Groups,
- entire directories — see User directories,
- organizations (with the CIAM add-on) — this adds the app to the organization's approved set: its administrators receive it automatically, while other members are authorized individually.
Directly assigned users are listed by audience: Employees and Customers each have their own section and count on the tab, and either can be revoked there. Granting one from here is offered for employees only, and the picker is scoped to them.
External users are not granted an application one by one. They reach it through their directory, through a group, or, as a member of an organization, through the individual authorization limited to the applications approved for that organization. There is deliberately no per-user grant outside that approved set, for business customers and consumers alike.
Revoking is never restricted: an assignment that exists can always be removed, including one that could not be created under today's rules. That is what makes the assignments of a tenant upgraded from an older rule cleanable.
Each assignment can optionally carry a start date and an expiration date, so access begins or ends automatically. Assignments also drive provisioning: a user is provisioned into a downstream application only while they have an active assignment.
Assignment is what governs access — there is no per-app login-method toggle. Which sign-in methods a user sees is decided by the directory or connection they belong to, not by a switch on the application.
Note: Depending on your subscription, you can let users request access to an application themselves and route those requests through an approval workflow rather than assigning them directly. See Per-application authentication and assignment policies.
Note: When an application belongs to a workspace with Workspace members manage access turned on, only workspace members with the Manage access permission (plus responsibles and full administrators) can assign or revoke its access.
Per-application authentication and assignment policies
On the application's policies tab you set two independent things: how strongly users must authenticate to reach the app, and whether assignments need an approval workflow.
Authentication requirement — choose one:
- Default — use the platform's standard authentication requirements.
- Always require MFA — every sign-in to this application requires a second factor.
- Apply an authentication policy — bind a conditional-access policy that decides when step-up or MFA is required, based on signals such as network location, time, or risk. See Authentication policies.
Assignment policies (require the workflows add-on):
- Users may request access: users request this app themselves through a self-service approval workflow instead of waiting for an admin to assign it, referencing an approval workflow you select.
To restrict who may assign this application, put it in a workspace with managed access. For the available factors and how step-up works, see Multi-factor authentication.
Add provisioning on top of SSO
Single sign-on and outbound provisioning are independent toggles on the same application. Configure SSO first so users can sign in, then optionally turn on Application provisioning so the platform also creates and maintains accounts in the connected app. You can run either alone or both together.
Reference
| Term | Meaning |
|---|---|
| Client ID | The application's public identifier at the platform. |
| Client secret | The confidential credential a web or machine-to-machine application uses to authenticate. |
| Public client | An app (single-page, native, device) that cannot keep a secret and uses PKCE instead. |
| Token exchange | An OIDC grant that swaps one token for another so a service can call downstream as the original user. |
| Redirect URI | An allowed URL the platform may return the user to after sign-in; matched exactly. |
| ACS URL | The SAML Service Provider endpoint that receives assertions. |
| Realm | The WS-Federation relying-party identifier. |
| Owner | A user responsible for an application; pairs with own-only delegated admin access. |
| Assignment | A grant that lets a user, group, directory, or organization use an application, optionally time-bound. |
Troubleshooting
- The application reports a redirect URI mismatch. Redirect URIs are matched exactly, including scheme, host, port, path, and trailing slash. Add the precise URI the application sends (check its request) to the redirect URIs list. Wildcards are not accepted.
- Sign-in fails right after rotating the client secret. The old secret stops working immediately when you rotate. Update the secret in the application's configuration, and make sure only one secret is in use at a time.
- SAML sign-in fails with a signature or certificate error. Confirm the service provider trusts the current signing certificate and that its clock is in sync. A large clock difference between the two systems makes assertions look expired or not-yet-valid.
- A user cannot see or open the application. Access is granted, not automatic. Assign the application to the user (directly, or through a group, directory, or organization). Without an assignment the application does not appear in the user's launcher and interactive sign-in is refused.
See also the glossary.