

Multi-factor authentication
Enable and govern second factors (TOTP, passkeys, security keys, SMS, recovery codes), plus enrollment and per-directory requirements.
Multi-factor authentication (MFA) requires users to prove their identity with more than a password. The platform supports a broad range of factors, lets you choose which ones your users may enroll, and decides when a factor is demanded through authentication policies. This page covers the global MFA configuration; the conditional logic lives in conditional access.
Employees and external users are configured separately
Note: With the CIAM (Customer Identity) add-on, the Multi-factor authentication page is split into two tabs — Employees and External users — and everything below (the enabled factors, the default requirement, and the additional settings) is configured independently for each. This lets you, for example, mandate phishing-resistant security keys for your workforce while offering customers and consumers a lighter set such as passkeys and authenticator apps. Which tab applies to a given user is decided automatically by whether their directory holds employees or external (customer/consumer) accounts. Without the add-on there is a single set of settings, which applies to employees.
The rest of this page describes the settings within one tab; they work the same way in both.
The available factors
You enable factors centrally; only enabled factors can be enrolled and required. Each factor offers a different level of assurance — see Authentication levels for how factors map to assurance levels.
The list mirrors the toggles on the settings page, including the two separate FIDO2 entries — passkeys and roaming security keys are independent switches:
| Factor | What it is | Assurance |
|---|---|---|
| Security keys (FIDO2) | A physical FIDO2 key (for example a YubiKey) plugged in or tapped. With hardware attestation it reaches the highest assurance level. | Strongest, phishing-resistant |
| Passkeys and platform authenticators | A credential bound to the device's biometrics or PIN — Windows Hello, Touch ID, Face ID — including passkeys synced across a user's devices. | Strong, phishing-resistant |
| TOTP authenticator app | Time-based one-time codes from an app such as Google Authenticator, Authy, or 1Password. | Strong second factor |
| Hardware token (OATH) | A display token with a printed serial that shows a one-time code, time-based or generated per button press, imported from a vendor seed file and assigned by an administrator. No smartphone, no app install. It is not stronger than an authenticator app: same code type, same assurance, and the seed exists both at the vendor and here. | Strong second factor |
| SMS / phone code | A code sent by text message to the user's verified mobile number. | Second factor |
| Recovery codes | A set of 10 single-use backup codes a user can fall back on when other factors are unavailable. They are shown once after the first factor is enrolled, and can be created again at any time in the account area. This is a toggleable factor in its own right — turning it off removes recovery codes as an option, not just a per-user backup. | Backup only |
Note: Email codes are not listed here, because email is not a factor of its own. Email is not an accepted out-of-band authenticator under NIST SP 800-63B, so an email code never satisfies a full multi-factor requirement — it can only back a password up to an enhanced single-factor level. It is also available to anyone whose email address is verified, with no enrollment step and nothing to remove per user, so there is nothing to switch on or off. Use TOTP, a passkey, or a security key wherever real MFA matters.
Where email codes are configured
Two different things use the email channel, and neither is a factor toggle on this page:
| Email code as a second factor | Email code login | |
|---|---|---|
| Role in the sign-in | Second factor, after a password | First factor: the whole sign-in |
| Where it is configured | Nowhere as a toggle — asked for only by an authentication policy that requires the enhanced single-factor level | On the directory's Authentication tab, per directory |
| Assurance reached | Password + email code = enhanced single factor (AAL1+) | Below the single-factor level (AAL0); no NIST assurance claimed |
| Licensing | Included | Requires the CIAM add-on on the Essential plan or above |
An email code is therefore only ever requested when an application's authentication policy asks for the enhanced single-factor level; the standard requirements ignore email entirely. To keep email out of an application's sign-in, do not select that level in its policy.
Email code login is a directory setting, not an MFA factor: it lets a user sign in with a code (or a sign-in link) mailed to their verified address, and can replace the password entirely. See User directories → Email code login for how to enable it and what users see.
Email never completes its own sign-in. A sign-in that started with an emailed code is never allowed to use email again as its second factor: the same channel cannot both begin and finish one login. When an application requires more than the email-code level, the user is asked for another factor, and only a passkey can satisfy that without a password. Keep passkeys enabled above for the directories where you rely on email code login.
Only passkeys and security keys can be added during an email-code sign-in. While a user is signed in with an emailed code, the "add a method" list offers exactly those two, plus the recovery codes that follow the first one. TOTP and SMS are left out because they cannot raise such a sign-in above the email-code level, so enrolling one would leave the user with a method that never unlocks a higher-assurance application. Users who need TOTP or SMS can add it after signing in with a password or a passkey. Methods the user already has stay listed and can still be removed. The same rule applies while signing in, so a user is never offered a factor that cannot complete the requirement.
Phishing-resistant factors
Security keys and passkeys are phishing-resistant: they cryptographically verify the site they are talking to, so a user cannot be tricked into authenticating against a fake login page. These are the recommended factors for administrators and high-value access.
Text-message (SMS) numbers
Plan note: SMS authentication, including mobile-number verification, is included on the Essential plan and above (and on Trial); it is not part of the Free plan.
The SMS factor sends a code to a user's verified mobile number. Unlike the other factors it is tied to the mobile number on the user's profile rather than a separate registration, so managing the number and managing the factor are the same thing. A user handles this in their account area:
- Add or change the number. On the personal-information page the user enters a mobile number (a country code plus the rest of the number). A newly entered number must pass the allowed-country check for text messaging.
- Verify. A one-time code is sent by text message and expires after a short time; the user enters it to confirm the number. Only a verified number counts as a factor. A number changed by the user or by an administrator needs a new verification, so the SMS factor never moves to a number nobody has confirmed. A number changed by a directory sync (for example Active Directory) keeps its verified state and the factor follows it, because the organization vouches for that number and the old one is usually no longer in use. From the verification screen the user can resend the code or switch to a different number.
- Remove. The user can remove the number, or remove just the SMS factor while keeping the number on file.
Changing the number always requires re-verification: the old number stops counting as a factor immediately, and the new one counts only once the fresh code is confirmed.
Editing the number. Because the mobile number is also the SMS factor, a user can keep it current even when general profile editing is turned off for their directory. It stays editable as long as the directory manages a mobile attribute and can write it (a local directory, or a synchronized one that pushes changes upstream); a read-only number mastered in an external directory such as Active Directory cannot be changed here.
Removing the last factor. When multi-factor authentication is mandatory for an employee, they cannot remove their last remaining factor (including SMS). This keeps workforce accounts from dropping below the required assurance; a lost factor is handled by resetting their MFA. Customer and consumer (external) users may remove their last factor themselves, since they have no administrator to reset it for them. The next sign-in that needs a factor then walks them through enrolling a new one.
Enabling factors
- Open Security → Multi-factor authentication in the Admin Console.
- Toggle each factor on or off. Changes apply immediately.
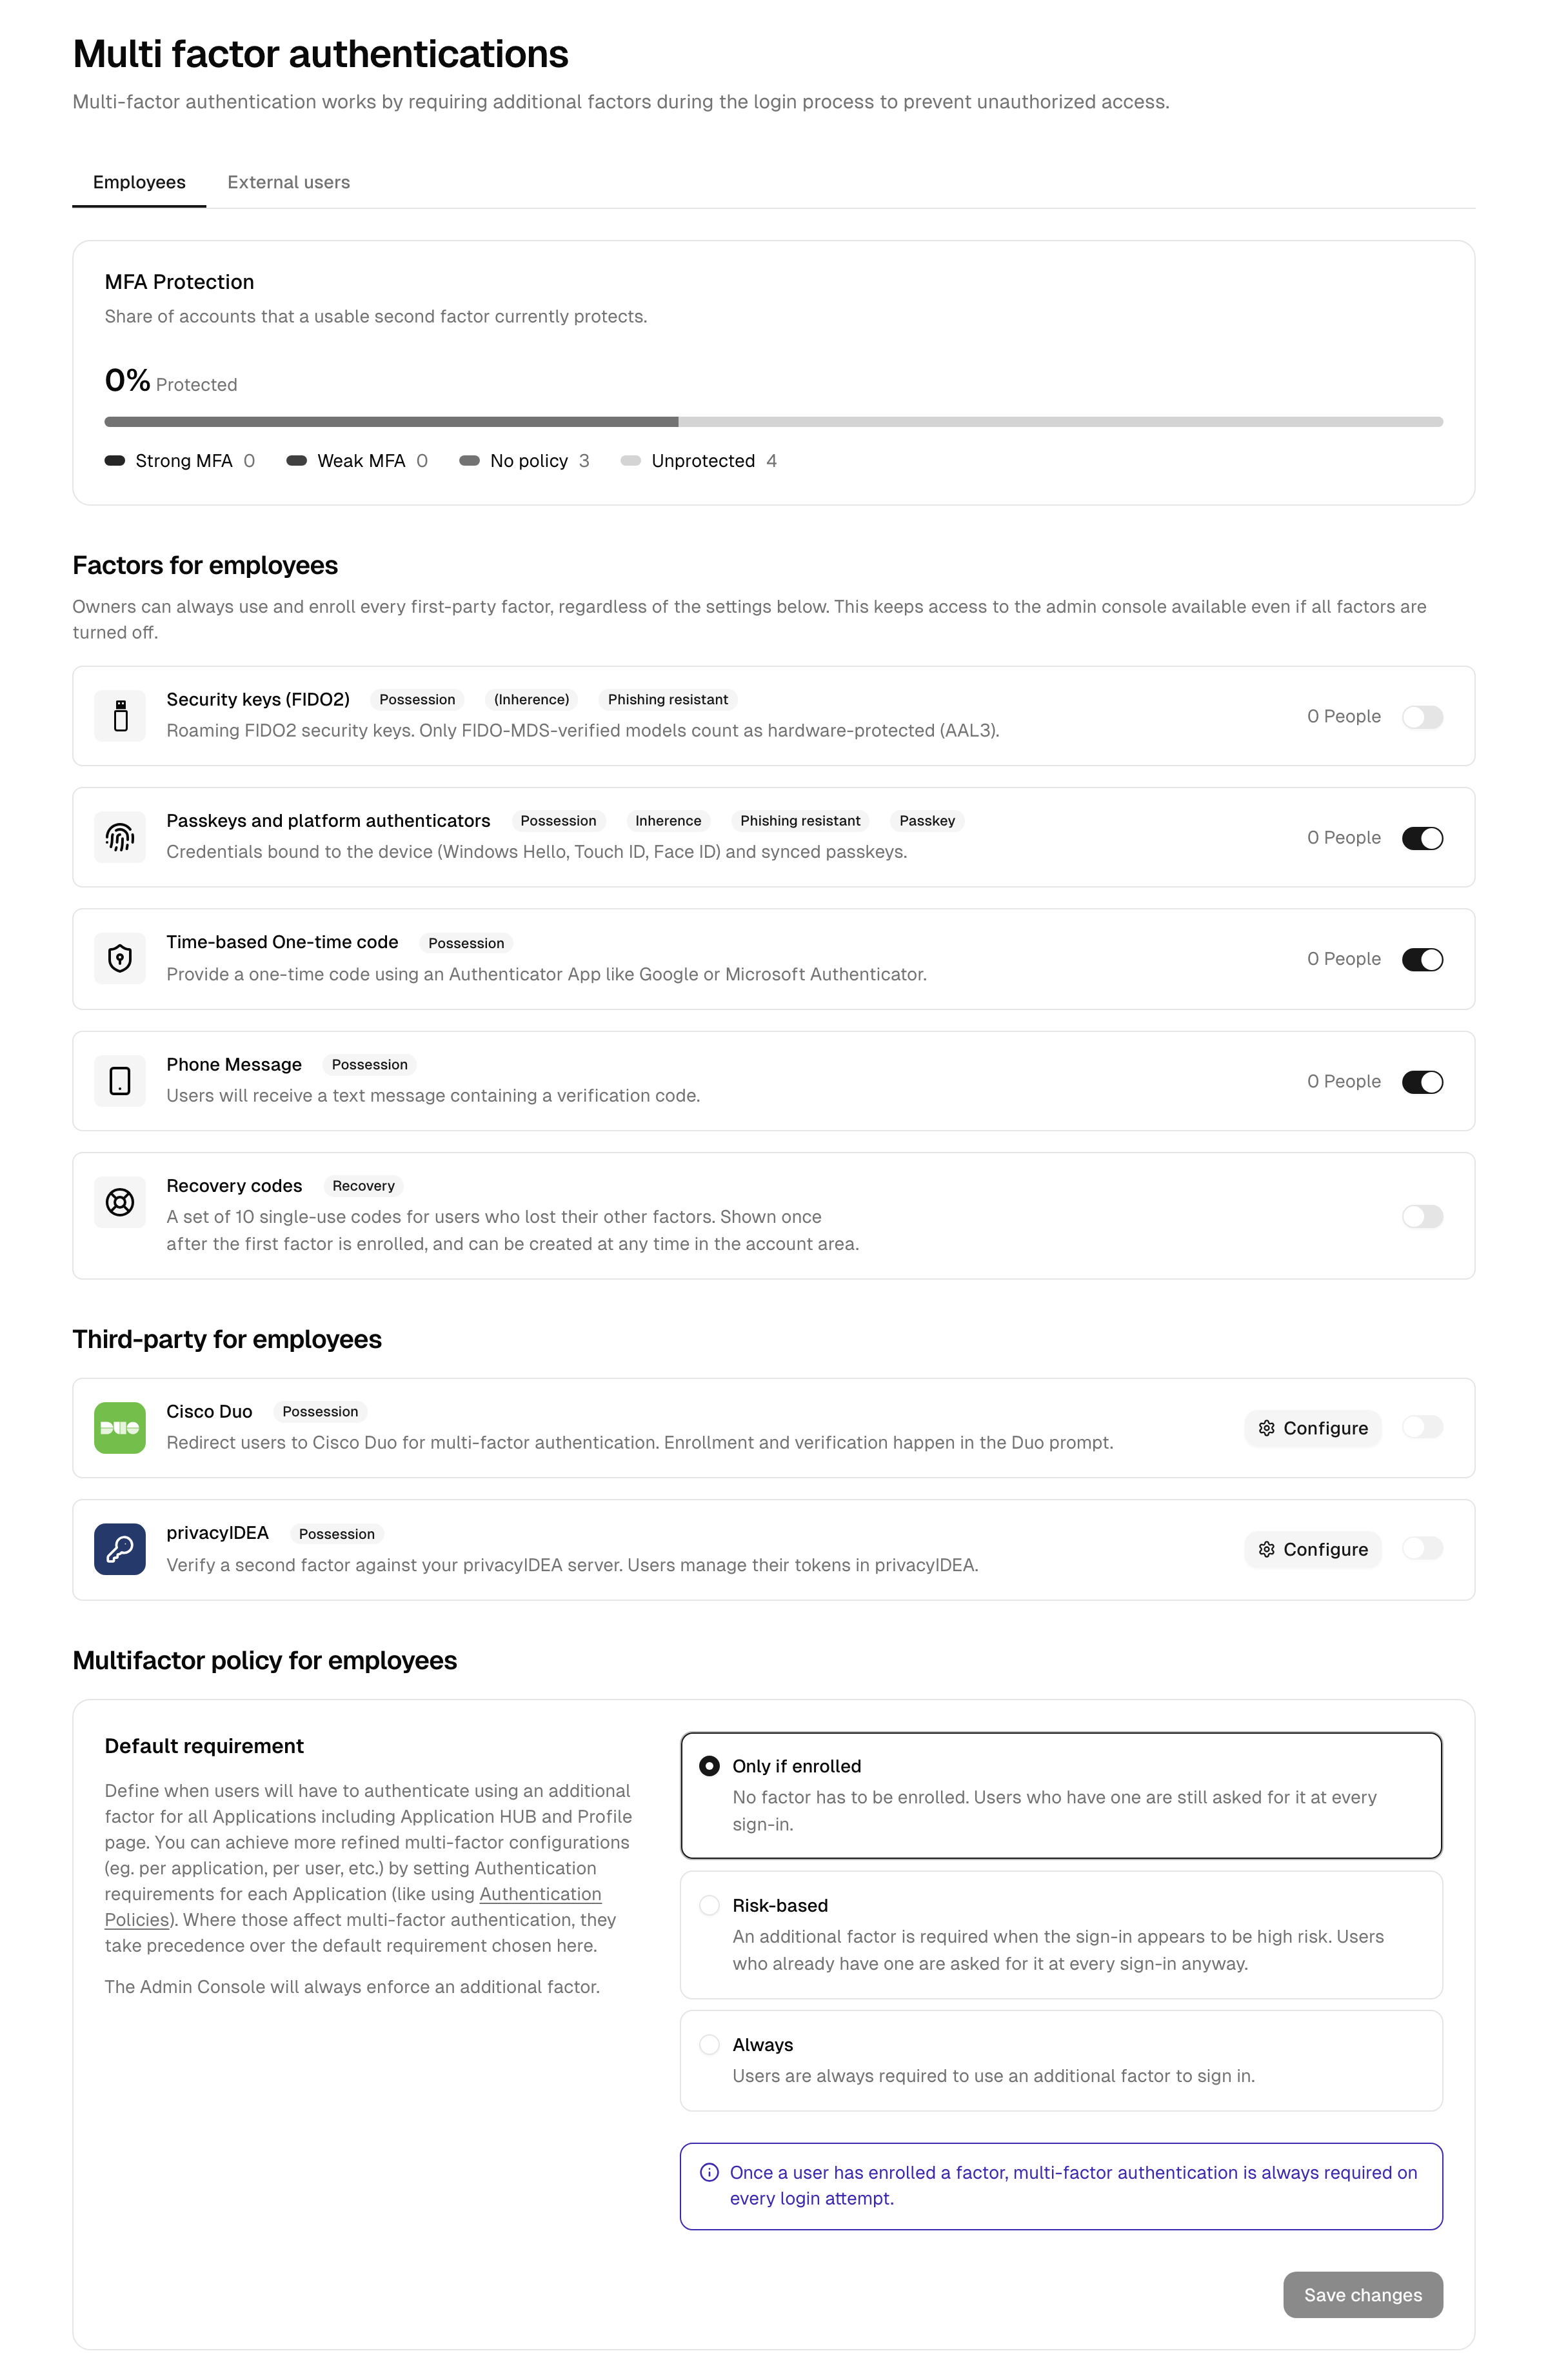
Leave at least one factor on. With every factor turned off, users have nothing to enroll and any application that requires MFA becomes unreachable for them. Nothing prevents that configuration, so check the requirement below before switching the last one off.
Owners always keep every built-in factor. Regardless of the toggles above, an owner can always use and enroll every built-in factor. This keeps a way into the Admin Console even when all factors are turned off, so an owner can always restore a broken configuration.
Check the coverage you actually have
Enabling a factor says what users may use, not what they do use. Each factor in the list shows how many users have it enrolled, counted for the audience of the tab you are on (with the CIAM add-on, employees and external users are counted separately). A user with two factors appears in both rows, so the numbers do not add up to your user count. Recovery codes and the third-party factors show no count: enrollment for Cisco Duo and privacyIDEA is held by those systems.
For the bigger picture, the MFA Protection summary at the top of the page shows the split across the audience of the tab you are on: strong (phishing-resistant), weak (authenticator app or SMS), unprotected, and accounts nothing requires MFA from. Only factors enabled here count towards it. The same breakdown for your employees also appears as a tile on the dashboard, which links straight to the unprotected accounts.
Turning a factor off after users enrolled it is worth checking there: those enrollments stop working, the affected users move to Unprotected, and they are asked to enroll a usable factor at their next sign-in.
Cisco Duo (third-party)
Add-on required: Cisco Duo is available on the Advanced plan and above, and is offered for employees only (not for external customer or consumer users).
Cisco Duo can be added as a third-party second factor alongside the built-in ones. When a login requires MFA and Duo is used, the user is redirected to Duo's hosted prompt to approve a push, enter a passcode, or use another Duo method, and is then returned to finish signing in. Enrollment and verification both take place in Duo, so no separate Duo enrollment is stored for each user here.
Because enrollment is delegated to Duo, every employee counts as set up for Duo as soon as it is enabled. As a result, multi-factor authentication is enforced for all employees regardless of the default MFA requirement (including when it is set to "Only if enrolled"), so plan the rollout accordingly. Users not yet known to Duo are handled by your Duo enrollment (New User) policy, which can enroll them during the prompt, allow them through, or deny access.
Set up Duo
- In the Duo Admin Panel, add a Web SDK application and note its Client ID, Client secret, and API hostname. Grant the relevant users or groups access to that application in Duo, otherwise they cannot sign in through it.
- In the Admin Console, open Security → Multi-factor authentication and select Configure next to Cisco Duo.
- Enter the API hostname, Client ID, and Client secret. Choose the username sent to Duo (email address or username) so that it matches how your users are identified in Duo.
- Select Test connection to confirm the credentials and reachability, then save.
- The Duo switch stays disabled until the configuration is saved. Once saved, enable it like any other factor.
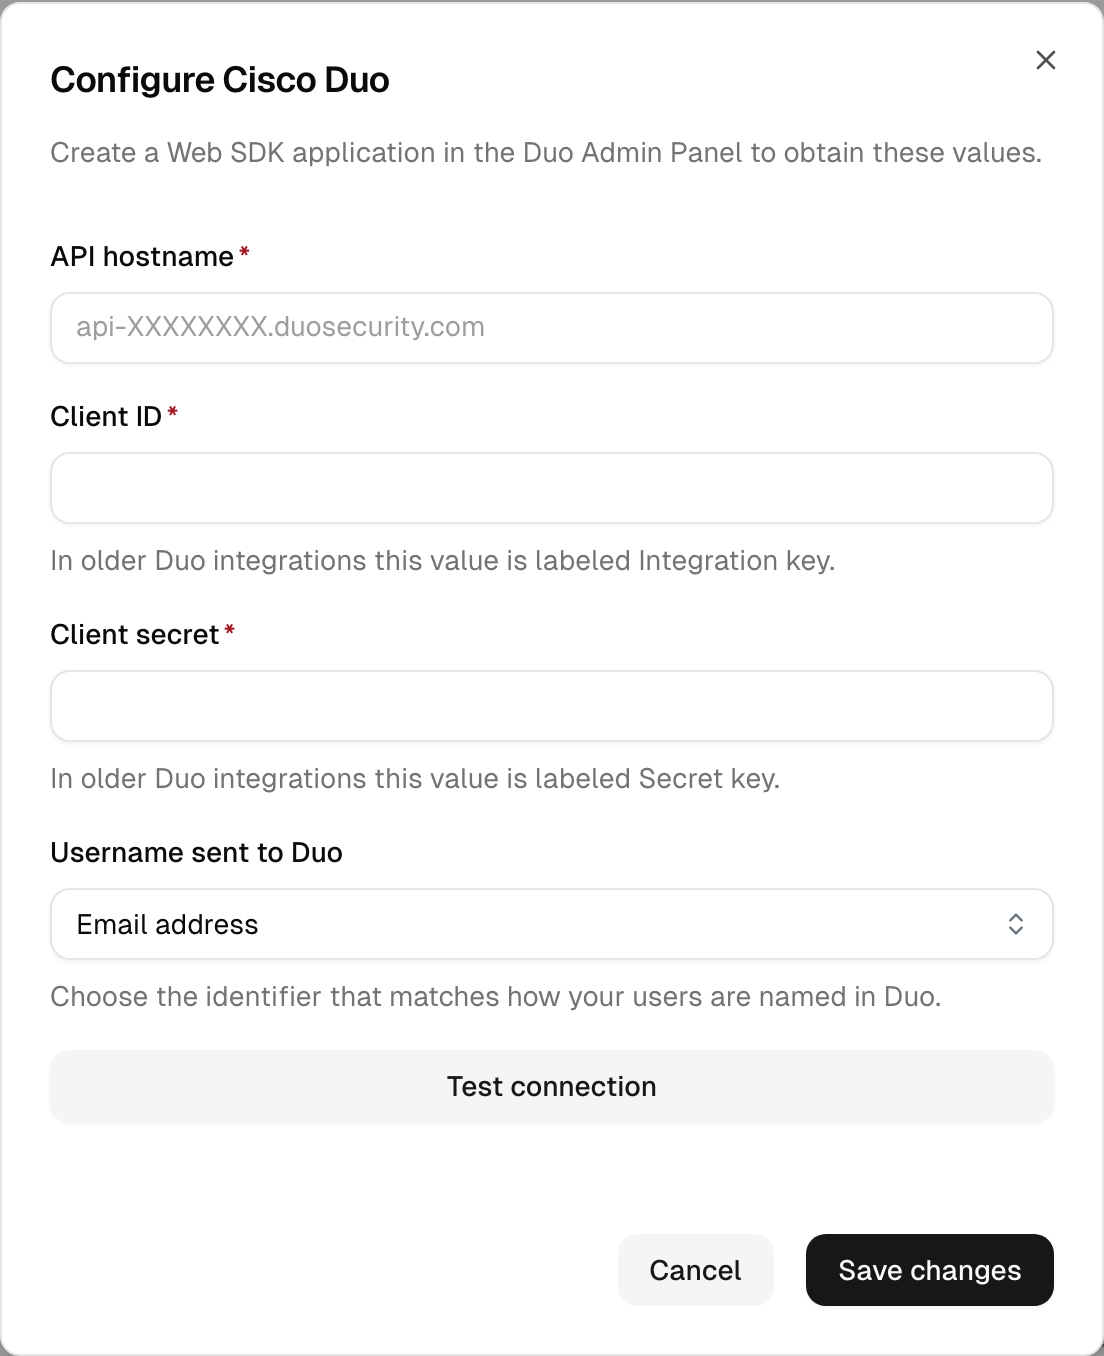
Duo reference and behavior
| Field | Notes |
|---|---|
| API hostname | The api-XXXXXXXX.duosecurity.com host of your Duo Web SDK application. |
| Client ID | Labeled Integration key in older Duo integrations. |
| Client secret | Labeled Secret key in older Duo integrations. It is stored securely and never shown again; leave the field blank when saving to keep the current value. |
| Username sent to Duo | The identifier passed to Duo. Set it to whichever of email address or username matches your Duo user directory. The chosen attribute must be enabled among the directory's managed attributes; for users whose directory does not manage it, Duo is not offered. |
- Duo coexists with the built-in factors. If Duo is temporarily unreachable, signing in with Duo fails for that attempt; users can pick a different method if other factors are enabled for them.
- Duo can be used to sign in to the Admin Console, but a Duo "allow access without 2FA" outcome (from your Duo New User Policy) never counts as a second factor there. If Duo is the only factor you enable and it becomes unavailable, administrators other than owners cannot reach the Admin Console until it is restored, so keep at least one built-in factor enabled for administrators.
- Duo push is a strong second factor but is not phishing-resistant. For the highest assurance, keep security keys or passkeys enabled as well.
- The credentials apply to the whole tenant. Turning the switch off stops offering Duo; the entered values stay stored for when you turn it back on.
privacyIDEA (third-party)
Add-on required: privacyIDEA is available on the Advanced plan and above, and is offered for employees only (not for external customer or consumer users).
privacyIDEA can be added as a third-party second factor alongside the built-in ones. When a login requires MFA and privacyIDEA is used, the user enters the one-time code from their token, or approves a push request on their phone, and the code is validated against your privacyIDEA server. Users manage their own tokens in privacyIDEA, so no separate enrollment is stored for each user here.
Because enrollment is delegated to privacyIDEA, every employee counts as set up as soon as it is enabled. As a result, multi-factor authentication is enforced for all employees regardless of the default MFA requirement (including when it is set to "Only if enrolled"), so plan the rollout accordingly. A user without a token in privacyIDEA cannot complete this factor, so keep another factor enabled as a fallback and make sure users are enrolled.
Set up privacyIDEA
- In privacyIDEA, create a service account and grant it the right to trigger challenges (the triggerchallenge right). This account is used to send push and message challenges on behalf of your users.
- In the Admin Console, open Security → Multi-factor authentication and select Configure next to privacyIDEA.
- Enter the server URL, an optional realm (leave blank for the server's default realm), and the service account and its password. Choose the username sent to privacyIDEA (email address or username) so that it matches how your users are identified there.
- Select Test connection to confirm the server is reachable and the service account is valid, then save.
- The privacyIDEA switch stays disabled until the configuration is saved. Once saved, enable it like any other factor.
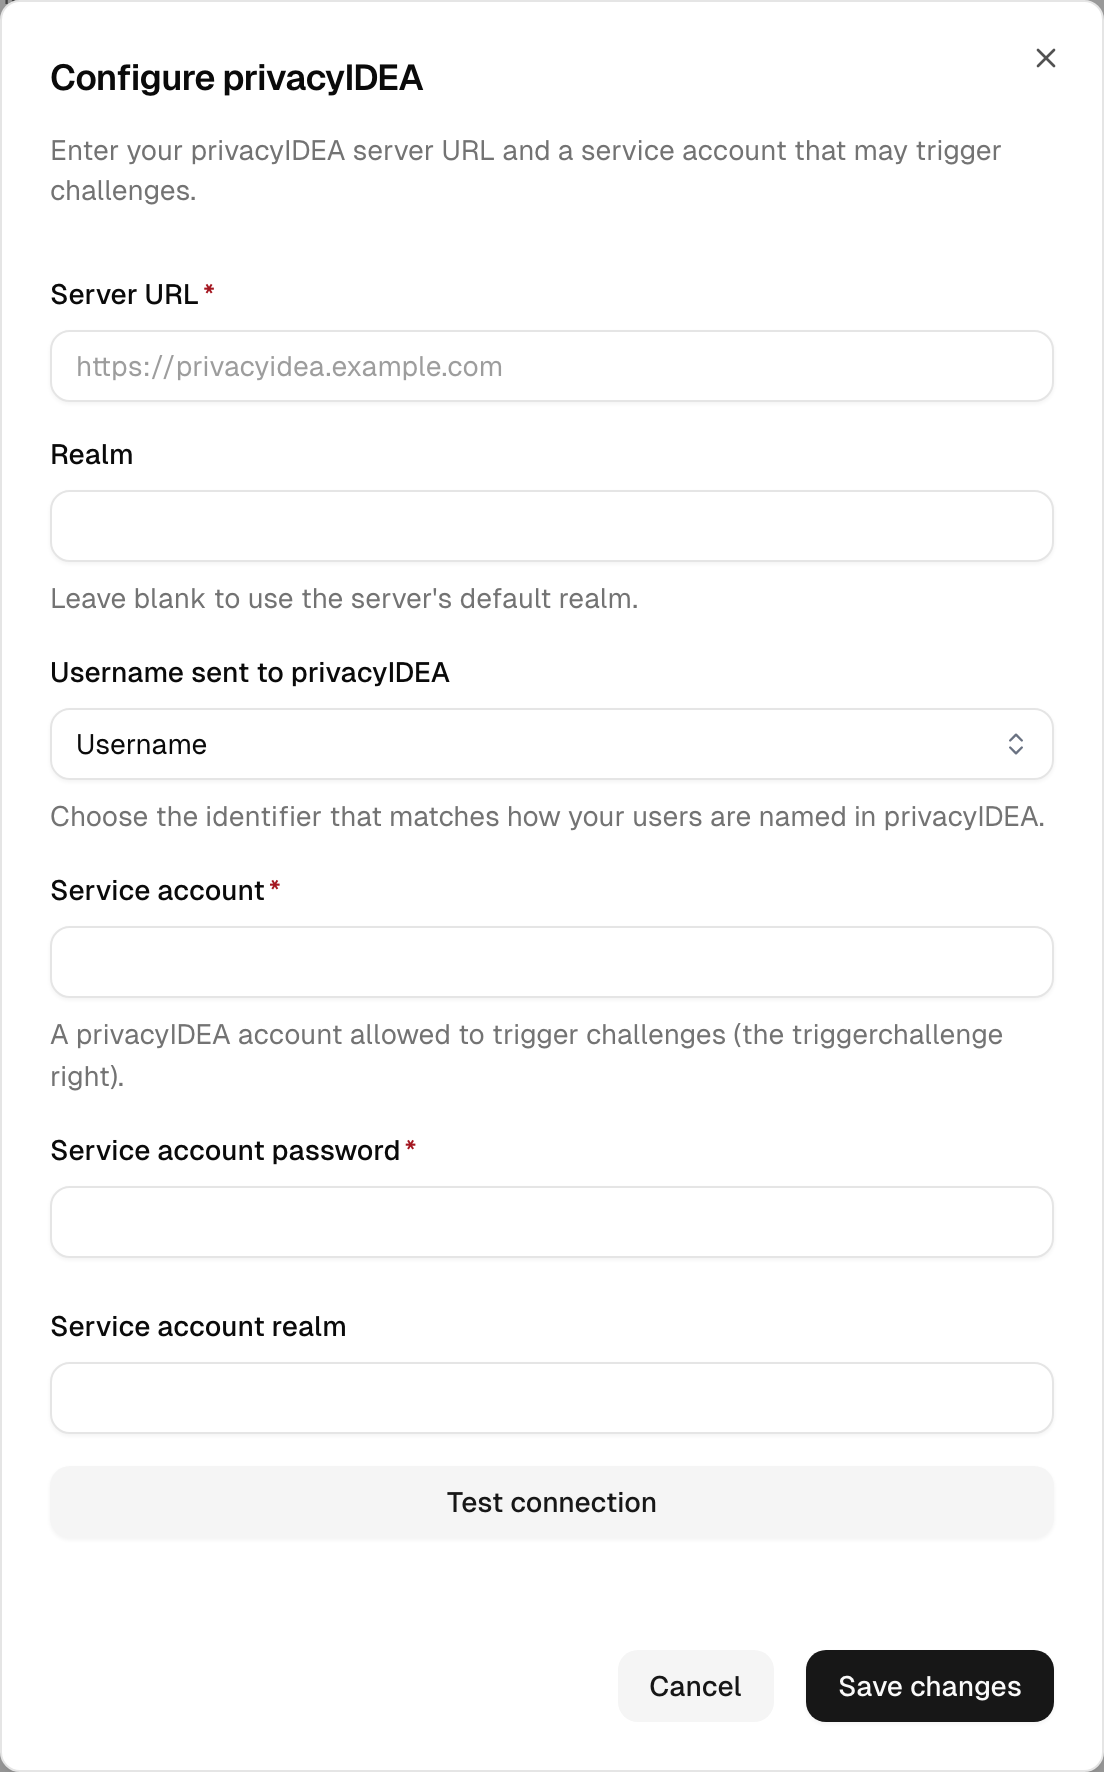
privacyIDEA reference and behavior
| Field | Notes |
|---|---|
| Server URL | The base URL of your privacyIDEA server, for example https://privacyidea.example.com. |
| Realm | The user realm to authenticate against. Leave blank to use the server's default realm. |
| Username sent to privacyIDEA | The identifier passed as the user. Set it to whichever of email address or username matches your privacyIDEA users. |
| Service account | A privacyIDEA account allowed to trigger challenges. Its password is stored securely and never shown again; leave the field blank when saving to keep the current value. |
- The assurance level of a login depends on the token used. One-time-code tokens (authenticator app, SMS) and push satisfy standard multi-factor authentication; an email token only satisfies low-assurance requirements. privacyIDEA is not phishing-resistant, so for the highest assurance keep security keys or passkeys enabled as well.
- privacyIDEA coexists with the built-in factors. If the server is temporarily unreachable it is simply not offered for that login, and any other enabled factors remain available.
- The connection applies to the whole tenant. Turning the switch off stops offering privacyIDEA; the entered values stay stored for when you turn it back on.
Hardware tokens (OATH)
Display tokens are for people who have no smartphone, must not install an app, or work where phones are not allowed. The platform imports the tokens your vendor delivered, you assign one to a user, and the user signs in with the code on its display. Available from the Advanced plan, for employees.
Be clear about what this buys you: an OATH token is not stronger than an authenticator app. Both produce the same kind of code, both cap at the same assurance level, and in both cases the secret exists twice (at the vendor and here). What you gain is operational: no smartphone, no app install, no bring-your-own-device discussion, and clean asset assignment. The one real security gain is that the secret is not in a phone's cloud backup. If you need higher assurance, use security keys instead.
Importing a vendor file
Open Security > Multi factor authentications, switch on Hardware token (OATH), then follow Inventory. Import seed file takes the file your vendor delivered, dropped into the dialog (or chosen with a click):
- PSKC (the XML format of RFC 6030), plain or encrypted. An encrypted container needs the pre-shared transport key or the passphrase your vendor sent separately; enter it in the same dialog exactly as delivered (some vendors ship a passphrase that looks like a hex string, it is still typed in as is). It is used to decrypt the file and is never stored. If a key package names no hash algorithm, it is derived from the seed length (32 bytes SHA-256, 64 bytes SHA-512, otherwise SHA-1) and the import report says so for that serial.
- CSV with the header row
upn, serial number, secret key, time interval, manufacturer, model(the format vendors ship for Entra customers). Columns are read by their header names, so the order does not matter and a file without the user column works; a file without a header row is rejected. The user column is ignored: a token is assigned deliberately, with the token in hand, never as a side effect of an import. A row without a time interval is an event-based token; the column itself must be present, a file without it is rejected. - SafeWord record file (
.dat), the format SafeNet / Thales ship with eToken PASS. Event-based and time-based records are both read.
The import produces a report: how many tokens were added, which serials were already in the inventory, which are already assigned to a user, and which were rejected and why. Each run gets an import id, so a wrong file can be undone with Delete this import (only the rows still in the inventory; tokens already assigned are untouched).
Warning: A seed file contains the tokens' shared secrets. CSV and .dat files hold them in plain text, so handle the file accordingly. Nothing in the product ever displays a secret again.
Whether a token is time-based (the code changes every 30 or 60 seconds) or event-based (a new code with every button press) is read from the file; nothing has to be chosen. Both work the same way for the user. Time-based tokens are the more robust choice where you still have one: anyone who briefly holds an event-based token can press its button and walk away with valid future codes, and a token whose button gets pressed many times without a sign-in needs a resync.
Assigning a token to a user
Open the user, choose Assign hardware token, and fill in the serial, one current code from the token's display, and how long the user may still sign in without it. The same dialog is available from the Inventory: the assign action on a token's row fills in its serial, and you choose the employee instead.
Entering the code is deliberate: it forces you to hold the token, which is what stops a wrong token going into the envelope, and it lets the platform learn the token's state up front. Time-based tokens sitting in stock for years drift, and event-based ones arrive with their button already pressed a number of times; resolving that here means the user later needs a single code like any authenticator app. A code that does not match is refused and nothing is written, so the token stays in the inventory; the failed attempt is recorded in the audit log, and after five misses in a row that serial is locked for 15 minutes.
The token then waits for the user to activate it, exactly like an administrator-registered security key: it appears on their MFA page as Pending activation, and one code from its display activates it, at sign-in or from that page. Choose Immediately for a handover in person; choose a period when the token travels by post, so the user keeps working while it is on its way.
If an event-based token is refused with one code although the serial is right, it has been used heavily before (for example at a previous identity provider, more than a thousand presses). Press the button once more and enter that next code in Second code: two consecutive codes let the platform find the counter unambiguously however far it has advanced.
Assigning a token to your own administrator account activates it at once: your code was already the proof of possession.
Living with assigned tokens
- The Inventory page lists assigned tokens too, with the holder and the assignment date (a pending one is marked Pending activation), so a serial can always be traced. Filtering by an import id shows only the rows still in the inventory.
- The user cannot remove the token themselves; it shows as Managed by your administrator. You remove it from the user's profile, and it goes back into the inventory with its secret intact, ready to be assigned again. This is why removal is not the same as deletion. Returned tokens are listed as Returned instead of an import id, so Delete this import never touches them.
- Deleting the user account, and completing an MFA reset for the user, also return the token to the inventory. Only Delete token destroys a secret.
- Resync appears on an event-based token. Sign-in accepts codes up to ten presses ahead; a token pressed more often than that without signing in is refused until the counter is realigned. Have the user press the button twice and read both codes to you, and enter them in order. A single code is deliberately not enough.
- Reset MFA is for a user with an active factor. While the token is still pending, remove the pending entry from the user's profile instead; the token returns to the inventory.
- Delete token in the inventory is the real deletion: it destroys the secret. Use it for a lost token or a wrong import; that token can only be used again after a fresh import.
- One token per user. To replace a token, remove the old one and assign the new one.
- If a token stops being accepted, its clock has usually drifted further than the login window allows. Remove it and assign it again, which measures the offset anew.
The default MFA requirement
Beyond per-policy rules, a global default requirement governs login when no authentication policy applies. There are exactly three options:
- Only if enrolled — no factor has to be enrolled. Users who do have one are still challenged at every sign-in.
- Risk-based — a second factor is requested only when the sign-in looks elevated-risk. Today that means a privileged employee account (one holding an admin access level or assigned roles) or an employee signing in from outside a trusted network zone. Everyday low-risk logins stay frictionless, though users who already have a factor are challenged anyway.
- Always — a factor must be enrolled, and is requested on every login.
Set this under Security → Multi-factor authentication. Finer logic (require MFA only on untrusted networks, for specific groups, or at a higher assurance level) belongs in authentication policies. Per-application authentication settings take precedence over this default.
Additional MFA settings
Below the factor list and the default requirement, a few global toggles fine-tune the experience:
| Setting | What it does |
|---|---|
| Show remember-browser option | Lets users skip the factor challenge on the same browser for a limited time (currently one month). It applies only to the factor that was satisfied; if a later access requires a stronger factor than the one remembered, the challenge is still raised. |
| Allow mail as recovery method | Lets users recover access by email when they lose their factor, reducing reset requests to admins. It is only offered when MFA is not strictly required for the application being visited. |
| Allow temporary access codes | Lets owners and administrators issue a one-time code for a user whose second factor is not at hand (a forgotten phone, a security key left at home). The code stands in for the second factor for a single sign-in within 60 minutes, the user is notified by email, and the code is never available for administrators or other Admin Console users. Off by default. Included on the Essential plan and above. |
Enrollment vs challenge
Two distinct moments are worth separating:
- Enrollment registers a factor for the first time. Users enroll in the end-user portal, or are walked through enrollment during login when a policy or the default requirement demands a factor they do not yet have.
- Challenge asks for an already-enrolled factor at sign-in.
When a requirement applies but the user has no usable factor yet, the login flow forces enrollment before sign-in completes — the user registers a factor on the spot, then continues. This is why a directory that suddenly requires MFA does not lock everyone out on day one: users enroll on their next sign-in rather than being blocked.
When recovery codes are enabled, a user who has no recovery codes yet is shown a fresh set the first time they set up a factor — both in the end-user portal and during this sign-in enrollment — so they leave with a backup in hand. The codes are displayed once; the user is prompted to save them before continuing.
Resetting a user's MFA
If a user loses their factors — a lost phone or misplaced security key — reset their MFA from the user's profile in the Admin Console.
- Send MFA reset link (default). The platform issues a one-time, time-limited recovery link and delivers it on a contact channel the user's directory manages — their email, or an SMS to a verified mobile if email is not available for them. The user opens the link, confirms with Continue on the page it shows, signs in with their password (or federated login), and is walked through enrolling a fresh factor. The confirmation step exists so that mail security scanners, which follow links in incoming mail before the recipient does, cannot use up the one-time link. Their existing factors keep working until the new one is enrolled, so the account is never left without protection — and because completing the reset still requires the user's own first factor, an administrator cannot take the account over on their own. If the user has no usable email or verified mobile, the Admin Console shows you the one-time link on screen so you can pass it to the user through a trusted channel. This on-screen hand-over requires an access level above the user's (owners are exempt), because whoever holds the link and the password could enroll their own factor. The link is valid for one hour.
- Remove a single factor (emergency). Only owners can instead remove one specific factor immediately, from the factor list on the user's profile. Use this when the link flow is not workable, for example a security key that stopped working: every other factor the user has stays enrolled. An owner's own last remaining factor cannot be removed this way (the Admin Console always requires a second factor); have a replacement enrolled first. All other roles (including administrators and help-desk operators) do not see this option, they can only send the reset link.
- Temporary access code (help desk). Available on the Essential plan and above. When Allow temporary access codes is enabled, owners and administrators can generate a one-time code from the user's profile instead of resetting anything. The code is shown once on screen, to be read to the user over a channel where you have verified who you are talking to (call back the number on file, video, or in person). It replaces the second factor for a single sign-in within 60 minutes; the user's enrolled factors stay untouched, and the code can be revoked from the profile while it is outstanding. The user is notified by email that a code was issued; the code itself is never mailed. Codes cannot be issued for users who hold an Admin Console access level, and remembering the browser is not offered after a code sign-in. A session started with a code cannot add, activate or remove second factors, nor change the mobile number or the recovery email.
Both actions notify the user. As an extra safeguard, if the user's email address was changed in the last few days, the previous address is alerted too, so an unexpected reset cannot slip by unnoticed.
Tip: When Allow mail as recovery method is enabled, eligible users can start this recovery themselves from the sign-in screen — a "Can't login anymore?" option emails them the same reset link, so they don't have to wait for an administrator. It is offered only where multi-factor is not strictly required for the application being signed in to; high-assurance apps still route through an administrator. It is also not offered when the user signed in with an email code: that recovery would let control of the mailbox alone replace a stronger factor, so it stays reserved for sign-ins that proved something else first.
Registering a security key for a user
A FIDO2 security key cannot be handed out pre-configured from a file: its private key is created inside the key during registration and never leaves it. So an organisation that wants to distribute ready-to-use keys registers them with the key in hand, from Users → the user → Register security key. Only owners and administrators see this action, and it is never offered for another owner's or administrator's account (those accounts can only be given a factor by their own holder).
The steps:
- Insert the user's security key into your own computer. Set a PIN on the key first if your policy expects one; a PIN cannot be enforced afterwards from here.
- Open the user's profile, choose Register security key and choose how long the user may still sign in without it.
- Select Register key, follow the browser prompt and touch the key. The key is named after its model; the label can be changed in the confirmation step, and the user can rename it later.
The key is now on the user's account, but not yet usable: it waits for the user's own confirmation. The user is emailed about the registration, sees the key on their MFA page marked Pending activation, and activates it by using it once, either at sign-in or from that page. Until then the key satisfies no requirement.
How long the user may sign in without it. Choose Immediately when you hand the key over in person: the next sign-in asks for it. Choose a period (2, 7, 14 or 30 days) when the key travels by post, so the user keeps working while it is in transit. Inside that period the user signs in with their password alone and is offered the activation page with a Continue without it link on each sign-in; the key stays assigned. Once the period expires, activation is required to continue. The activation page has no way to remove the key: a user who does not have it rejects it from their MFA page, or you unassign it. The sign-in is honestly recorded at the level it actually reached (single factor) while the period runs.
Users cannot remove a key an administrator registered for them: it shows as Managed by your administrator. Removing it is your call (or the MFA reset link, which replaces it). What the user can always do is reject a key that is still pending, which is their protection against a factor placed on their account without their knowledge. Every registration is written to the audit log as MFA Enrolled by Admin, naming the administrator who did it, and can be alerted on with an alarm.
Note: One physical key can serve several accounts. Each registration creates a separate credential inside the key, so registering a key that is already in use elsewhere is normal FIDO behaviour and not an error. What is refused is registering the same key twice on the same account.
Registering a key for another user is available to everyone who may manage users' security settings (operators included), for accounts below their own access level. You can also use this action on your own account (a convenient way to add a key from the console). That is self-service: the key is active at once, with no activation step.
Per-directory MFA requirement
Each user directory can independently require MFA enrollment for its members. This lets you, for example, mandate strong authentication for an internal employee directory while leaving a customer directory more permissive. Configure this on the directory itself.
Security-key hardware assurance
For the highest assurance level (a hardware-protected, phishing-resistant credential), the platform must be sure a security key really is a hardware device and not a software impersonation. It establishes this at registration time by validating the key's attestation against the published FIDO metadata (the FIDO Alliance Metadata Service, MDS). A key that proves a hardware-protected credential earns the top assurance level and can satisfy policies that demand it.
This runs automatically for every newly registered security key; there is no setting to switch it off. Whether the top level is actually required is decided in your authentication policies, which is the place to relax the requirement if you do not need it. Authenticator models the FIDO Alliance has flagged as compromised are rejected at registration.
Note: Platform authenticators and synced passkeys (Touch ID, Windows Hello, iCloud Keychain passkeys) are intentionally treated as strong, phishing-resistant factors but not as hardware-protected keys — they cap one level below. This is by design.
Troubleshooting
- "Send MFA reset link" is refused with "You are not allowed to manage employees". The Support access level may only update external (customer) users, so it can send the reset link for those but not for employees. Have an operator, administrator, or owner send it, or raise the access level. See Admin Console users.
- A user is locked out after losing their phone or security key. Reset their MFA from the user's profile. The default reset link lets the user enroll a fresh factor while their old ones still work; removing a single factor directly is the last resort for when the link flow is not workable.
- A security key or passkey is already registered and cannot be set up again. This happens when the key was reset or stopped working while its registration is still on record. The end-user portal offers to register it again in place of the old registration: the new registration is stored first, only then is the old one removed, so the account is never left without a factor. For security keys the offer appears while a single key is registered; with several keys, remove the one no longer in use and set up the replacement normally.
- A passkey or platform authenticator does not work on a new device. A platform authenticator (Touch ID, Windows Hello) is bound to the device it was created on. On a new device the user enrolls a new factor. For a factor that moves between devices, use a roaming security key or a synced passkey, and keep recovery codes as a fallback.
- The self-service "Can't login anymore?" reset is not offered. It appears only when mail as a recovery method is enabled and only where multi-factor is not strictly required for the application being signed in to. High-assurance applications always route the reset through an administrator.
- A user is still asked for a second factor although email code login is on. An email-only sign-in sits below the single-factor level, so any application requiring more triggers an additional challenge. Only a passkey satisfies that without a password. Either lower the requirement for that application, or have the user enroll a passkey. The Admin Console is deliberately exempt and always requires more.
- A user who signed in with an email code is then asked for the password. That application's authentication policy requires a password specifically, and no second factor can stand in for one. The password screen says so and no longer offers the code. This is the intended way to keep individual applications on a real password while email code login stays available elsewhere.
- TOTP or SMS is missing from the "add method" list. The user is signed in with an email code. Only a passkey or security key is offered in that state, because no other method can raise such a sign-in. The full list returns once they sign in with a password or a passkey.
- A newly enrolled security key cannot satisfy a top-level policy. Hardware assurance is only credited when the key's attestation could be validated against the FIDO metadata at enrollment time — a key whose model is not in the metadata, or that sends no attestation, stays one level below. Have the user enroll a FIDO-certified security key.
- The Duo "Test connection" fails. Recheck the API hostname, Client ID, and Client secret, and confirm the Duo application is of the Web SDK type. The test also fails if Duo cannot be reached from the network.
- A user gets an error or is denied in the Duo prompt. Duo governs unknown users through its own enrollment (New User) policy, and users must be granted access to the Web SDK application in Duo. Check both in the Duo Admin Panel.
- Duo does not recognize a user. The identifier the platform sends must match the user in Duo. Set Username sent to Duo (email address or username) to whichever matches your Duo directory.
- The privacyIDEA "Test connection" fails. Recheck the server URL and the service account and its password. If your privacyIDEA server uses a certificate from an internal certificate authority, that authority must be trusted by the platform host (set
NODE_EXTRA_CA_CERTSat deployment); an untrusted certificate causes the test and every login attempt to fail. - A user cannot complete the privacyIDEA factor. The user needs at least one token enrolled in privacyIDEA. Enroll a token in the privacyIDEA self-service portal, and keep another factor enabled as a fallback. WebAuthn/FIDO2 privacyIDEA tokens are not supported here; use a passkey or security key as a built-in factor instead.
- A push request never arrives. Push delivery is configured on the privacyIDEA side (the push token and its notification service). Confirm the user has a working push token in privacyIDEA and that the service account may trigger challenges.
- The "Register security key" action is missing or greyed out. It requires the permission to manage users' security settings, roaming security keys enabled for that user group, and a target account below your own access level (or your own account). It also only appears for active or suspended accounts, since a newly created account has no sign-in yet.
- The browser says the key is already registered. The key already holds a credential for this account, either active or still pending activation. Use a different key, or remove the existing registration first.
- A user can still sign in without the key you registered. You chose a period rather than Immediately, so the activation is not yet due. The user's MFA page shows the deadline; after it, the key is required. During the period this applies to applications whose policy demands multi-factor as well.
- A user says a security key they do not have appeared in their account. A pending key can be rejected by the user from their MFA page. Check the audit log for MFA Enrolled by Admin to see which administrator registered it.
- A hardware token is refused although the serial is right. The code is checked against the token's own secret, so a mismatch means the token in your hand is not the one with that serial, or its clock has drifted more than a day, or an event-based token has been pressed more than a thousand times (then add the Second code). Try the serial printed on the device you are holding; if it still fails, the token is out of range and has to go back to the vendor.
- A user's event-based token stopped working. The button was pressed more than ten times without a sign-in. Use Resync on the token in the user's profile with two consecutive codes.
- "Assign hardware token" is missing. Hardware tokens must be switched on for employees, the plan must include them, and the target must be an account below your own access level (or your own). It is not offered for external users.
- A serial was skipped during an import. The report says why: already in the inventory (nothing is overwritten), already assigned to a user (the secret must not exist twice), or rejected with a reason such as an unsupported code length.
- A removed token cannot be assigned again. Removing a token from a user returns it to the inventory; deleting it there destroys the secret. If it was deleted, import the vendor file again.
Related
- Authentication levels reference — how factors map to assurance levels.
- Authentication policies — require MFA or step-up conditionally.
- Glossary — definitions of MFA, WebAuthn, passkey, and assurance level.