

People
Browse, create, and invite the users in your identity estate: user types, the People list, per-user detail views, and invitations.
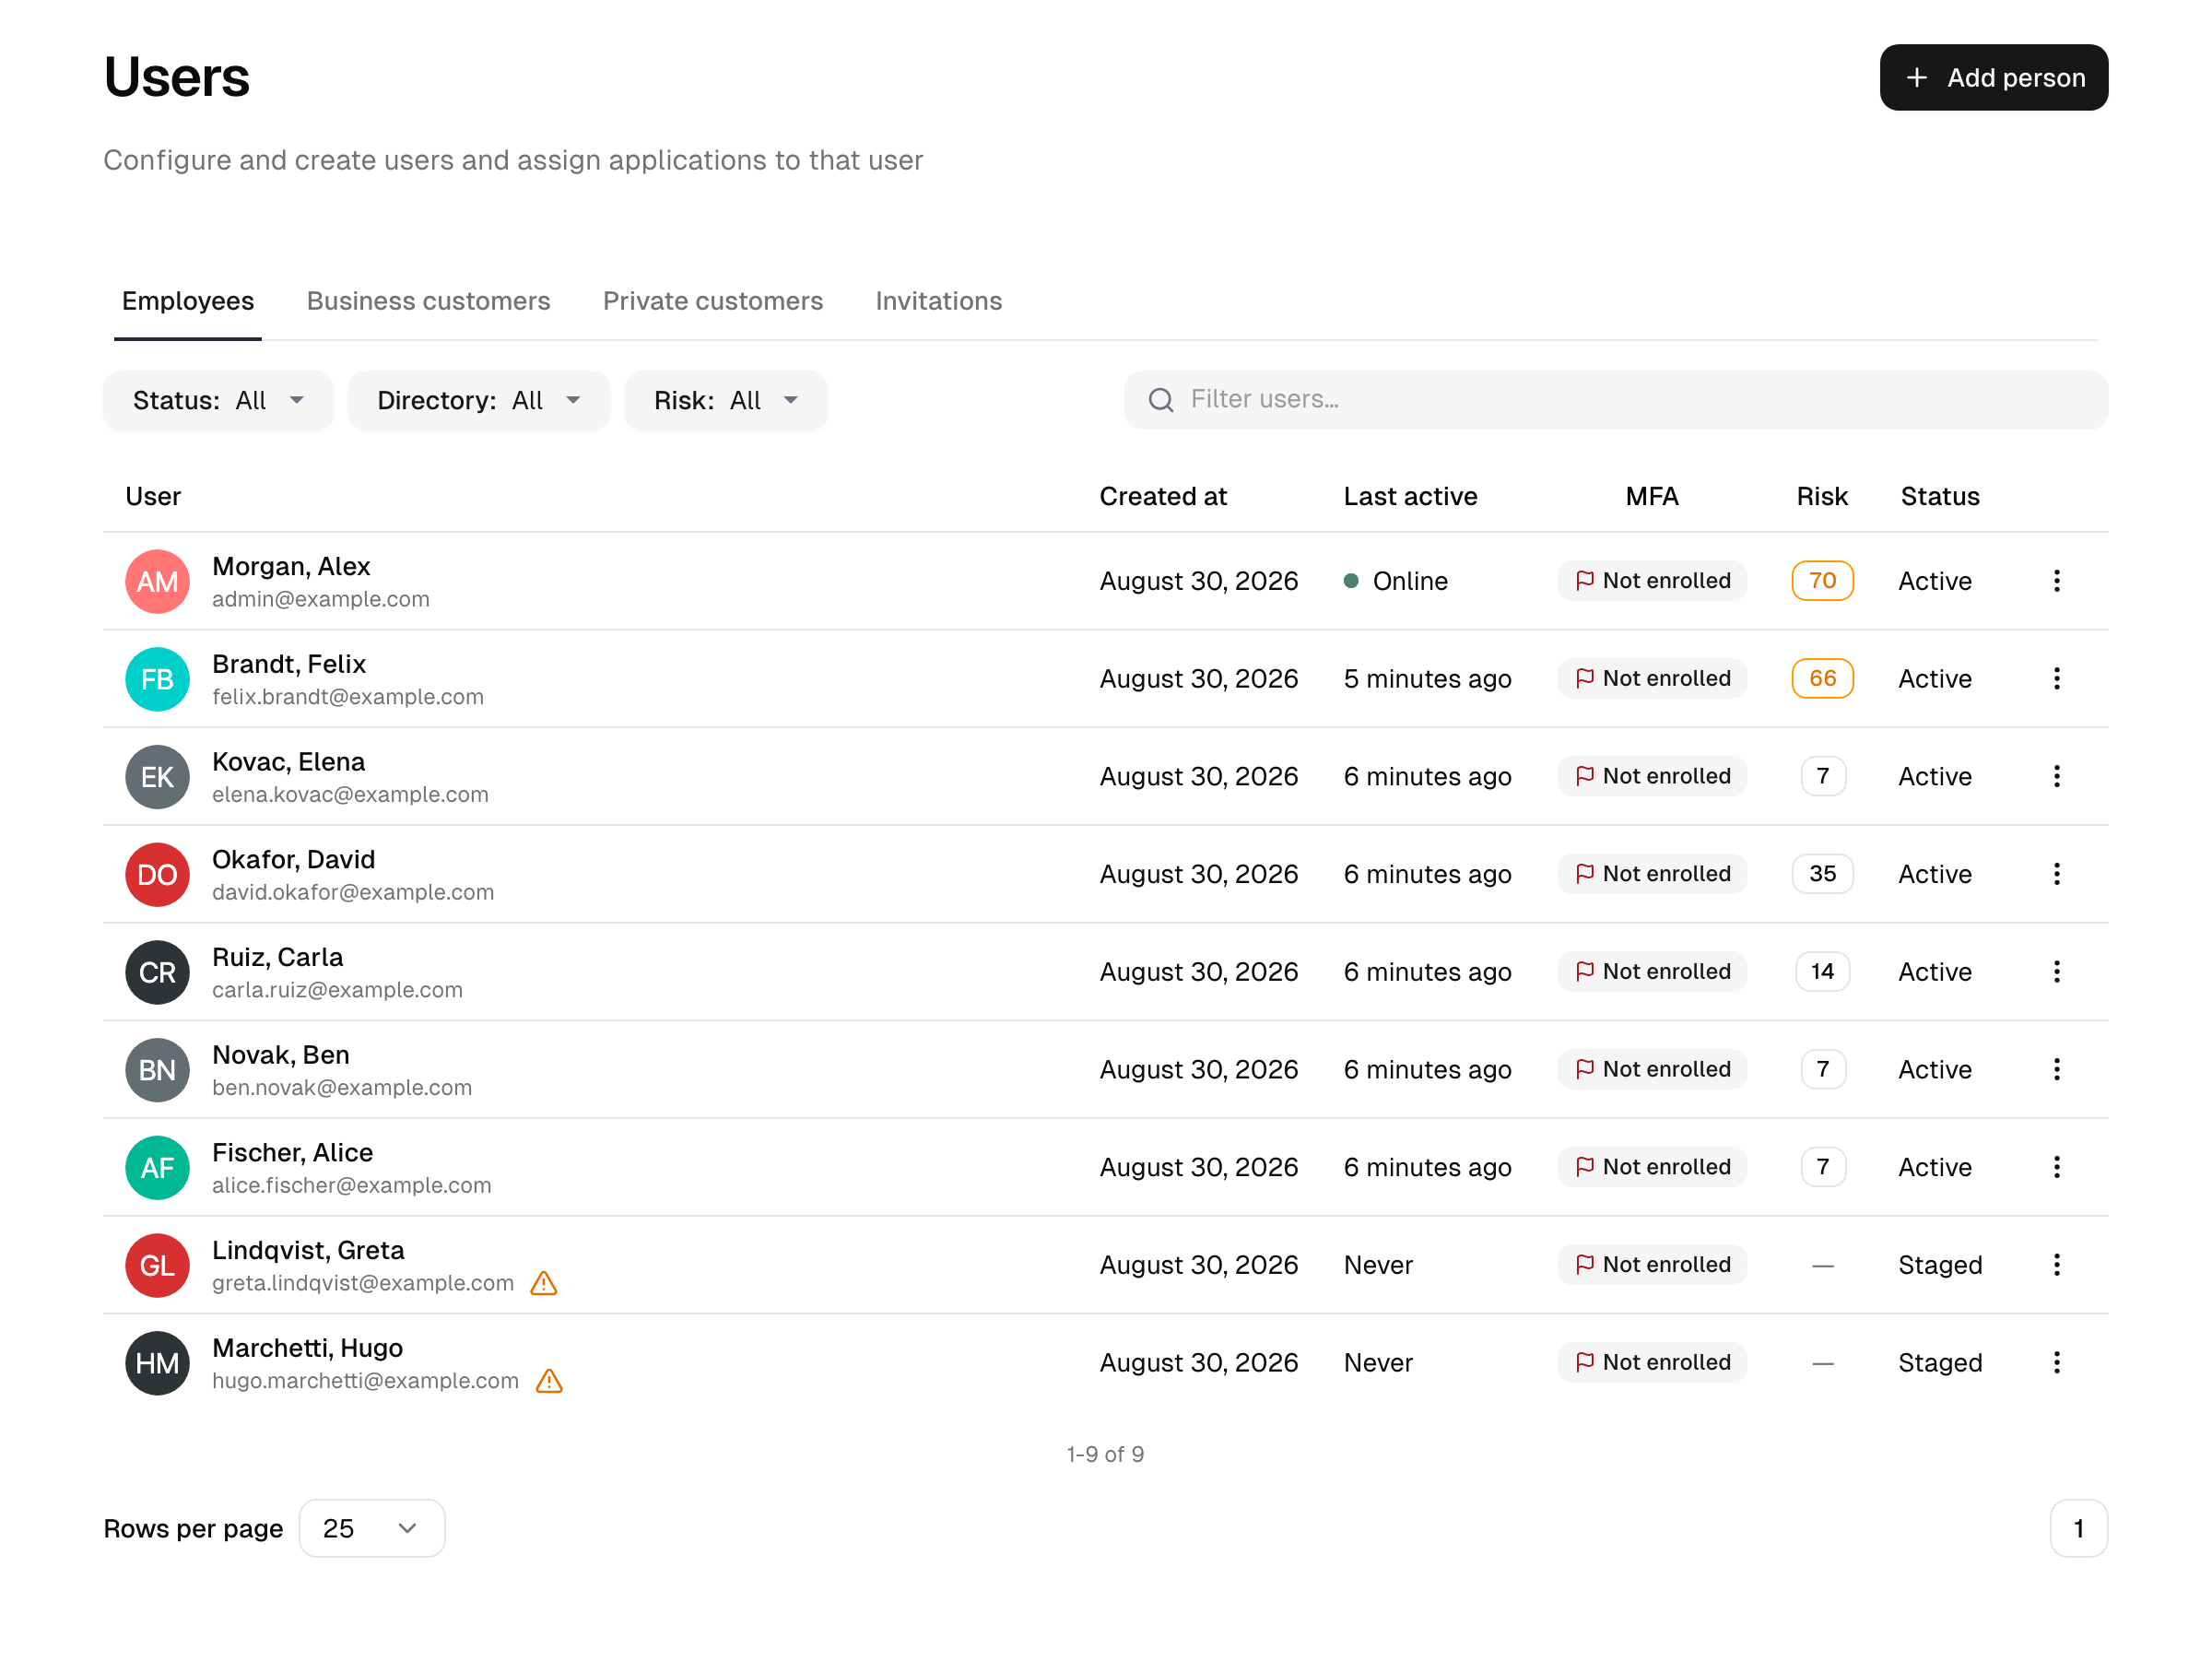
People is the central list of every user account. From here you open a user to inspect or change their profile, access, and security state; create new accounts; and invite external users to sign up. The list is split by user type so you can focus on the population you manage.
User types
Every user has a type that is determined by the directory they belong to. The console groups the People list into three tabs:
| Type | Who they are | Add-on |
|---|---|---|
| Employees | Your internal workforce. | Included |
| Customers | External business users, typically members of a B2B organization. | Customer Identity |
| Consumers | External individual end users (for example, self-registered accounts). | Customer Identity |
Note: The Customers and Consumers tabs require the CIAM (Customer Identity) add-on. Without it, only Employees is available, and any directories that would hold external users are hidden unless they still contain accounts from a previously licensed period.
The People list
Each tab lists users with their key attributes and lets you filter and search. You can narrow the list by:
- Directory — restrict to users from one directory.
- Status — where the account is in its lifecycle: created but not yet activated (staged), activation pending (provisioned), active, locked, password expired, suspended, or offboarded (deprovisioned); see User lifecycle.
- Group and Role — show only members or assignees.
- Department.
For security operators and auditors, the list also shows a risk column and lets you sort or filter by posture risk. This column and the risk filter are only available to roles that can read user-security information; see User lifecycle → Posture risk score.
For internal admin accounts, the employee list can also show an Access level column and an Access level since column, so you can see who holds console access and when it was last changed. The access-level catalog itself lives on the Admin console users page.
The employee tab also shows a limit banner as you approach or exceed the number of employee users your subscription includes.
The list toolbar
The list shares one toolbar with the other console lists:
- Views opens a side panel holding the standard views and your own saved views. Save current view stores the active columns, sort, filter rules, and search term under a name. Saved views are personal and are not visible to other administrators.
- Column headers open a menu with Sort ascending, Sort descending, Filter (adds a filter rule for that column) and Hide column. The list is sorted by last activity until a column is chosen; the sort is part of the URL and is stored with a saved view. Columns that show derived values (directory, MFA, manager, organization) cannot be sorted.
- Columns selects which columns appear and lets you drag them into the order you prefer. Beside the columns shown by default, the picker offers email, username, department, position, company, office location, employee number, manager, mobile, organization, last login, and whether the email address is verified.
- Filter builds rules of the form field, operator, value. The operators depend on the field: a field with a fixed set of values offers is any of and is none of, a descriptive field takes typed text with contains, does not contain, is, is not, starts with and ends with, and a date field takes a from/to range with time from one picker (a day click fills the whole day, a blank side leaves the range open on that side; times are read in your own time zone). Every field also offers is empty and is not empty. Several values in one rule match any of them, several rules apply together. The button names the fields currently filtered on, and the cross beside it clears every rule.
- The search box looks up the best match while you type and shows the completion in grey behind the cursor. Tab accepts that completion, Enter searches for the typed text.
- The export button downloads the filtered list as a CSV file, with the visible columns in the chosen order.
The complete state lives in the page address, so a filtered list can be bookmarked or handed to a colleague.
Finding people
The list searches and filters on name, email, login identifier, status, directory, group, role, and department. It reflects current state immediately: a freshly created, invited, or just-synced user appears right away — there is no search-index lag to wait out.
Viewing a user
Open a user to reach their detail page, organized into tabs:
| Tab | What it shows |
|---|---|
| Overview | Status, directory, key attributes, and the posture risk badge. |
| Profile | Standard and custom profile fields (editable where the directory allows it). |
| Groups | Group memberships, including externally synced ones. |
| Roles | Assigned roles. |
| Permissions | The effective permissions a user holds, and which role grants each. |
| Applications | Applications the user can access, the assignment source, and where you assign applications directly to the user. |
| Organizations | Organization memberships (Customer Identity). |
| History | The user's audit trail, with its own search, event-type and date filters. Shown to admins who may read the whole audit log. |
The detail page is also where lifecycle actions live — change status, reset MFA, change password, unlock, verify email or mobile, and more. Those actions are covered in User lifecycle.
Assigning applications to a user
What the Applications tab offers depends on the user's type:
- For employees, you assign one or more applications directly to the user. Each assignment can carry an optional validity window: a start date, an end date, or both. The list marks an assignment as scheduled until its start date and as expired once its end date passes, so time-boxed access is visible at a glance. Applications on which the deprecated Owners manage access is still on can be assigned here only by their owners or a full administrator.
- For organization members (B2B customers), the tab lists the apps in their organization's approved set, and you authorize or revoke each one for that member individually — access is opt-in, not automatic. See Organizations → Application access.
- For consumers (B2C), application access is decided at the directory level, so there is no per-user assignment here.
Note: Organization administrators implicitly receive every application in their organization's approved set, so you do not authorize those apps for them one by one.
Creating a user
You create a user into a specific directory, because the directory determines the available profile fields and the authentication method.
- From the People list, choose Create user and select the target directory.
- Fill in the profile fields. The form adapts to the directory: enterprise (AD/LDAP) directories ask for the directory-specific identifiers, and any required custom attributes appear here too.
- Choose how the account is activated:
- Activate later — the account is created in a staged state and cannot sign in yet.
- Send activation link — the account is provisioned and the user receives an email to set their own password and activate.
- Set a password now — you set an initial password; optionally force a change at first sign-in. The email is marked verified and the account is active.
- Save. You are taken to the new user's detail page.
Note: Operators restricted to external users cannot act on employee accounts at all — not just creation. They cannot view, edit, delete, reset MFA, change status, password, or directory, or manage groups and roles for an employee account. The restriction spans every user action and is enforced both in the UI and on submit.
Invitations
Instead of creating an external user yourself, you can invite them to register. An invitation sends an email with a one-time code; the recipient completes their own profile and sets credentials during signup.
- The Invitations entry point (reachable from the People list) lists pending invitations and lets you resend, cancel, or delete them.
- Invitations can target a directory that allows signup, optionally place the user in an organization, grant organization-admin rights, and pre-authorize applications.
- Invitations expire after a fixed period and are cleaned up automatically after that.
The full invitation flow — including how an invited user activates — is described in User lifecycle → Invitations.
See also
- User profiles & attributes — what the profile fields are and how to extend them.
- User lifecycle — activation, status changes, risk, impersonation, and sessions.
- User directories — where users are stored and how they authenticate.